Advanced Image processing (RxJs conveyor, Drag-And-Drop, Canvas WebGL/Three, OCR, EXIF, Steganography, and other - Watermark, Histogram, etc).
- 1. Mouse Moving RxJS animation.
- 2. Raw WebGL animation in Canvas.
- 3. Three library to make animation in Canvas.
- 4. Use Module bundler with Three.js
- 5. Protect your privacy with EXIF.
- 6. Drag-And-Drop image.
- 7. OCR (Optical Character Recognition).
- 8. Steganography - hiding data within an image.
- 9. Write Histogram in Browser.
- 10. Apply Watermark to images.
- 11. Other Advanced Image manipulation.
1. Mouse Moving RxJS animation.
Simplest way to create various effects is using Mouse Moving events with RxJs, I like this effect and use it to learning RxJs at all My RxJs learning conspectus. This is 2 new examples with the same way.
To start this examples I use image server to avoid any issue with CORS:
# node ImageServer/Server.js
And if image http://localhost:3000/images/Frontend.png present its possible to start this examples:
1: const { fromEvent } = rxjs;
2: const { map, throttleTime } = rxjs.operators;
3:
4: const container = document.getElementById('container');
5: const image = document.getElementById('image');
6:
7: // Create an observable for mouse movement
8: const mouseMove$ = fromEvent(container, 'mousemove').pipe(
9: throttleTime(100) // Throttle to avoid too many events
10: );
11:
12: // Subscribe to mouse movement
13: mouseMove$.subscribe(event => {
14: const { offsetX, offsetY } = event;
15:
16: // Create a bubble with random radius and color
17: const bubble = document.createElement('div');
18: bubble.classList.add('bubble');
19:
20: const radius = Math.floor(Math.random() * 50 + 10); // Random radius between 10 and 60
21: const color = `rgba(${Math.random() * 255}, ${Math.random() * 255}, ${Math.random() * 255}, 0.7)`;
22:
23: bubble.style.width = `${radius * 2}px`;
24: bubble.style.height = `${radius * 2}px`;
25: bubble.style.backgroundColor = color;
26: bubble.style.left = `${offsetX - radius}px`;
27: bubble.style.top = `${offsetY - radius}px`;
28:
29: // Add the bubble to the container
30: container.appendChild(bubble);
31:
32: // Remove the bubble after 1 second
33: setTimeout(() => {
34: container.removeChild(bubble);
35: }, 1000);
36: });
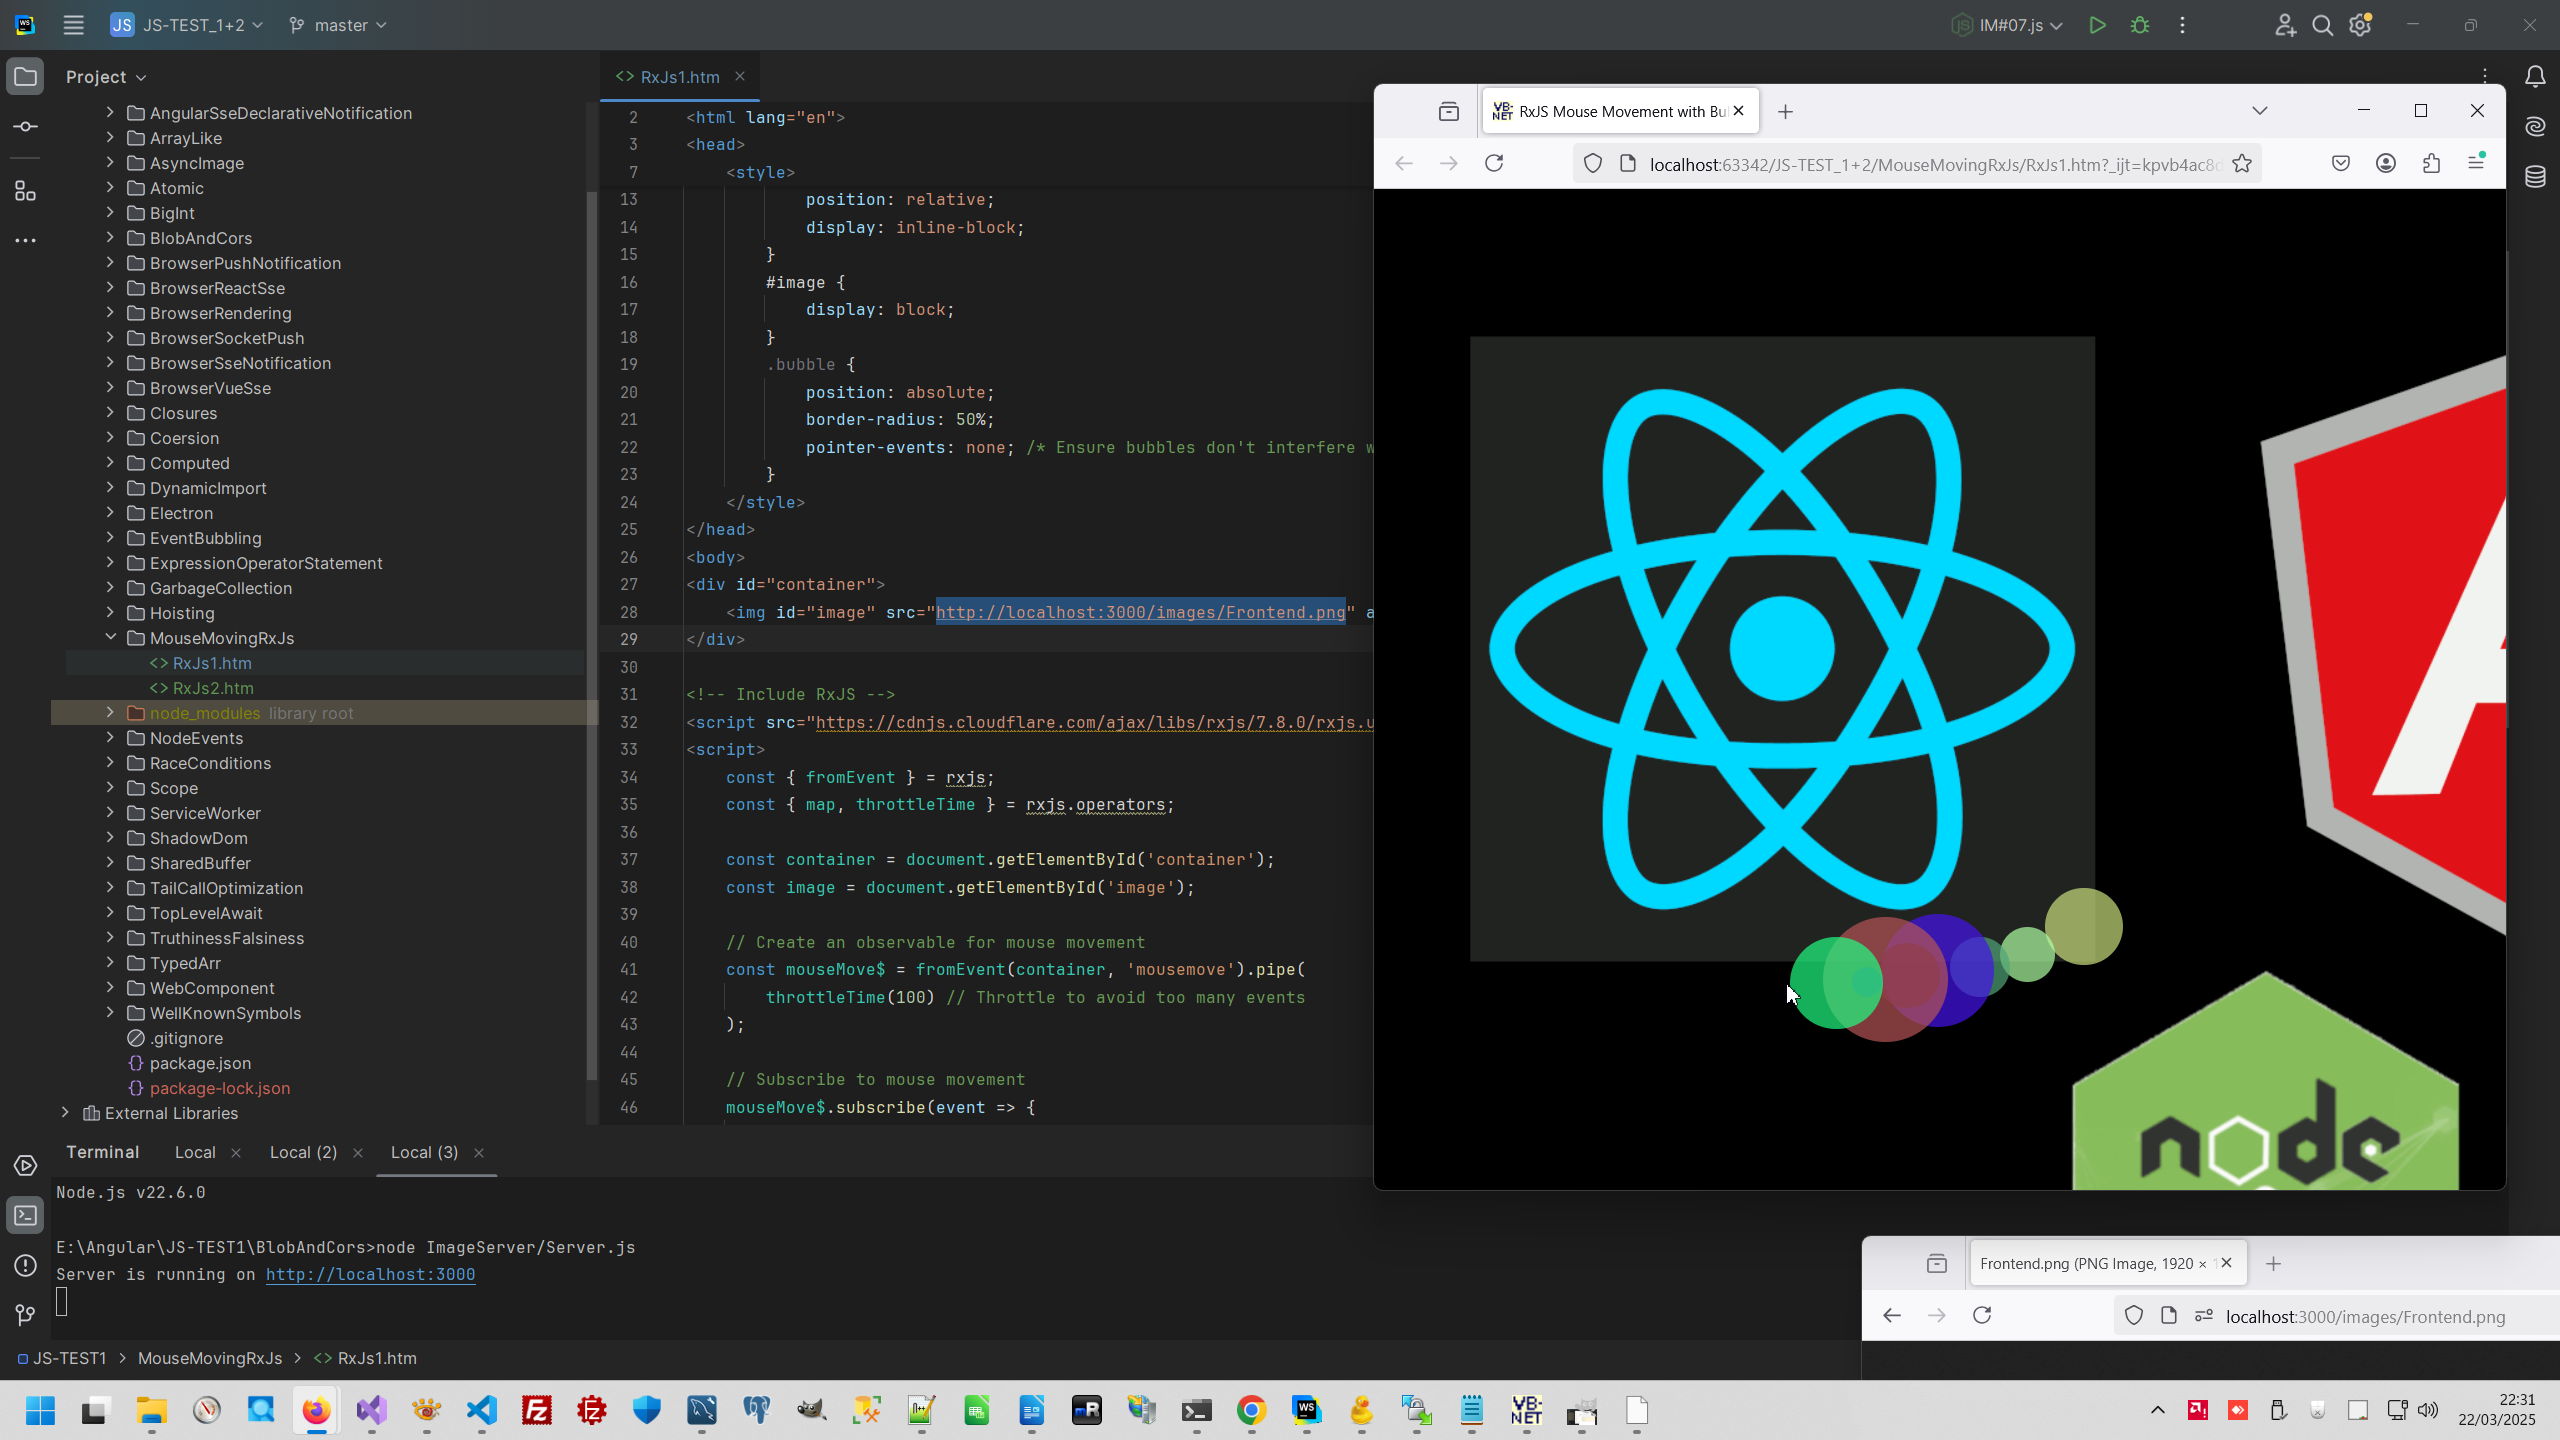
Code uploaded to https://github.com/AAlex-11/ImageAdvanced/tree/main/MouseMovingRxJs
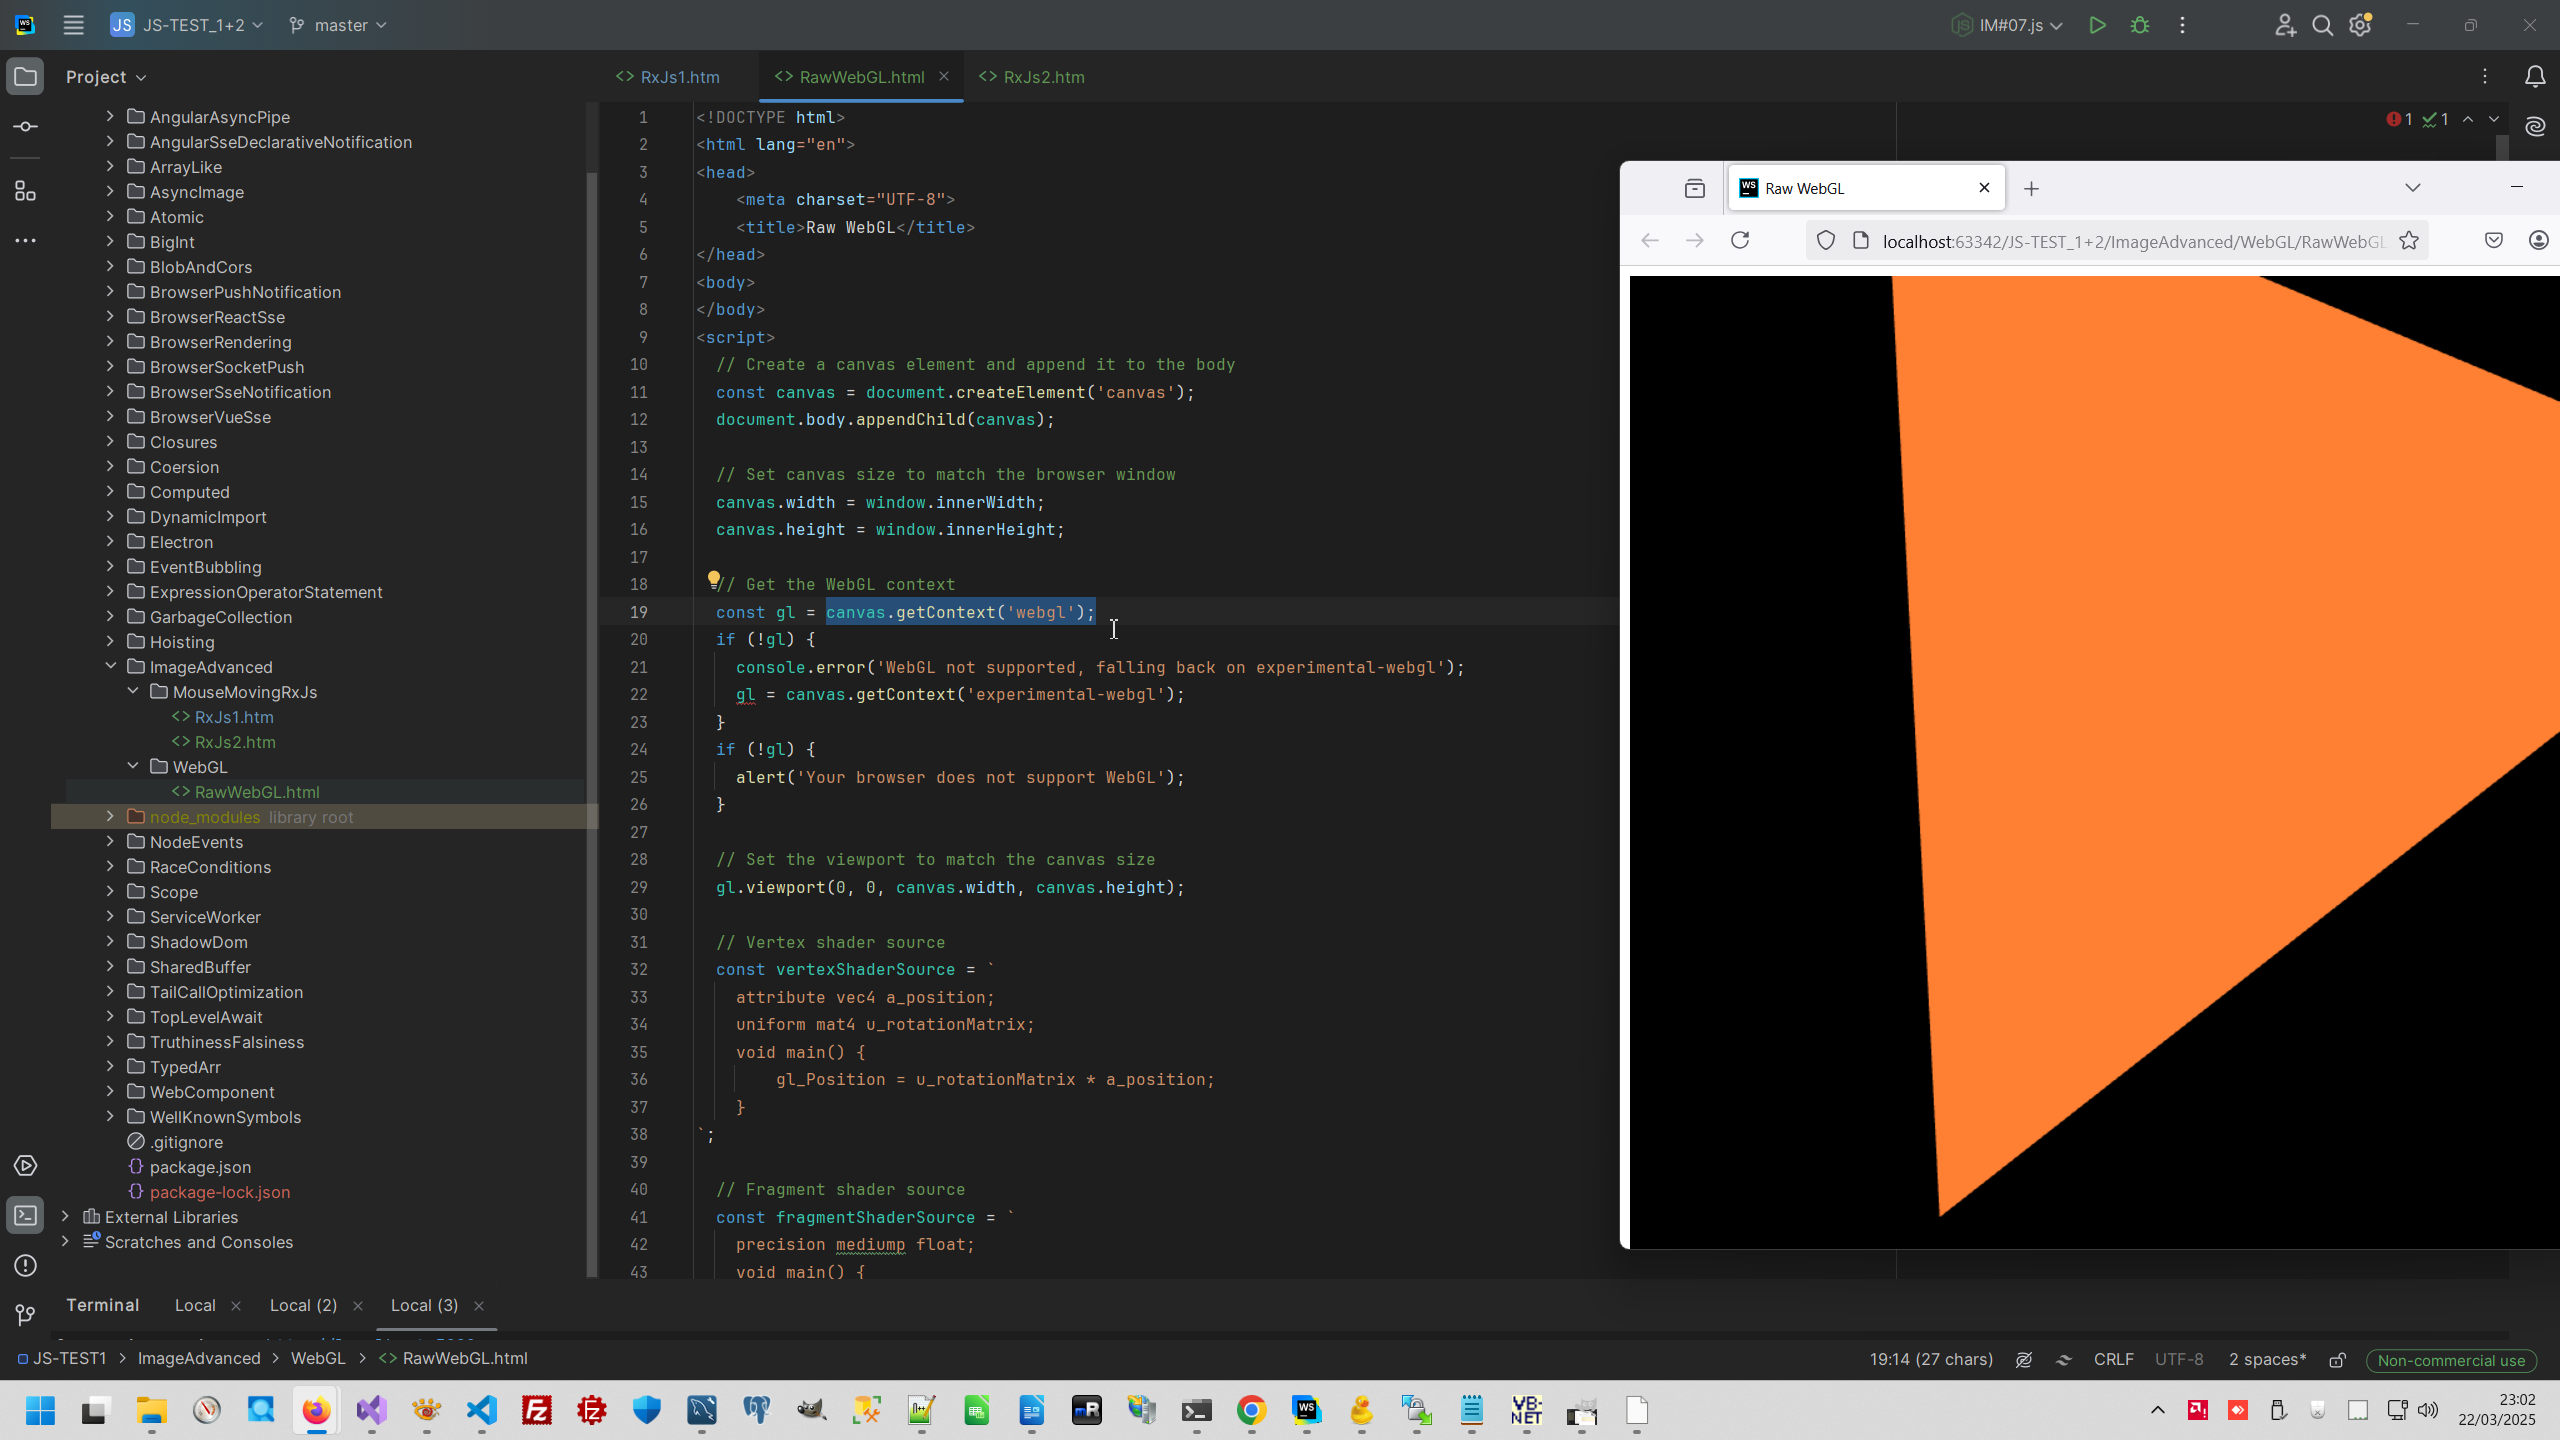
2. Raw WebGL animation in Canvas.
Canvas is special Browser place to create graphic Canvas API, WebGL is special driver founded on special Video Card features ( WebGL: 2D and 3D graphics for the web ). We can call WebGL function directly, like this:
1: // Create a canvas element and append it to the body
2: const canvas = document.createElement('canvas');
3: document.body.appendChild(canvas);
4:
5: // Set canvas size to match the browser window
6: canvas.width = window.innerWidth;
7: canvas.height = window.innerHeight;
8:
9: // Get the WebGL context
10: const gl = canvas.getContext('webgl');
11: if (!gl) {
12: console.error('WebGL not supported, falling back on experimental-webgl');
13: gl = canvas.getContext('experimental-webgl');
14: }
15: if (!gl) {
16: alert('Your browser does not support WebGL');
17: }
18:
19: // Set the viewport to match the canvas size
20: gl.viewport(0, 0, canvas.width, canvas.height);
21:
22: // Vertex shader source
23: const vertexShaderSource = '
24: attribute vec4 a_position;
25: uniform mat4 u_rotationMatrix;
26: void main() {
27: gl_Position = u_rotationMatrix * a_position;
28: }
29: ';
30:
31: // Fragment shader source
32: const fragmentShaderSource = '
33: precision mediump float;
34: void main() {
35: gl_FragColor = vec4(1.0, 0.5, 0.2, 1.0); // Orange color
36: }
37: ';
38:
39: // Compile shaders
40: const vertexShader = gl.createShader(gl.VERTEX_SHADER);
41: gl.shaderSource(vertexShader, vertexShaderSource);
42: gl.compileShader(vertexShader);
43:
44: const fragmentShader = gl.createShader(gl.FRAGMENT_SHADER);
45: gl.shaderSource(fragmentShader, fragmentShaderSource);
46: gl.compileShader(fragmentShader);
47:
48: // Check for shader compilation errors
49: if (!gl.getShaderParameter(vertexShader, gl.COMPILE_STATUS)) {
50: console.error('Vertex shader compilation error:', gl.getShaderInfoLog(vertexShader));
51: }
52: if (!gl.getShaderParameter(fragmentShader, gl.COMPILE_STATUS)) {
53: console.error('Fragment shader compilation error:', gl.getShaderInfoLog(fragmentShader));
54: }
55:
56: // Create and link the program
57: const program = gl.createProgram();
58: gl.attachShader(program, vertexShader);
59: gl.attachShader(program, fragmentShader);
60: gl.linkProgram(program);
61: gl.useProgram(program);
62:
63: // Check for program linking errors
64: if (!gl.getProgramParameter(program, gl.LINK_STATUS)) {
65: console.error('Program linking error:', gl.getProgramInfoLog(program));
66: }
67:
68: // Set up geometry (a triangle covering the entire screen)
69: const vertices = new Float32Array([
70: -1.0, -1.0, 0.0, // Bottom-left
71: 1.0, -1.0, 0.0, // Bottom-right
72: 0.0, 1.0, 0.0 // Top-center ]);
73:
74: const buffer = gl.createBuffer();
75: gl.bindBuffer(gl.ARRAY_BUFFER, buffer);
76: gl.bufferData(gl.ARRAY_BUFFER, vertices, gl.STATIC_DRAW);
77:
78: const positionAttributeLocation = gl.getAttribLocation(program, 'a_position');
79: gl.enableVertexAttribArray(positionAttributeLocation);
80: gl.vertexAttribPointer(positionAttributeLocation, 3, gl.FLOAT, false, 0, 0);
81:
82: // Function to create a rotation matrix
83: function getRotationMatrix(angle) {
84: const cos = Math.cos(angle);
85: const sin = Math.sin(angle);
86: return new Float32Array([
87: cos, -sin, 0, 0,
88: sin, cos, 0, 0,
89: 0, 0, 1, 0,
90: 0, 0, 0, 1
91: ]);
92: }
93:
94: // Render loop
95: function render() {
96: gl.clearColor(0.0, 0.0, 0.0, 1.0); // Clear to black
97: gl.clear(gl.COLOR_BUFFER_BIT | gl.DEPTH_BUFFER_BIT);
98:
99: // Update rotation matrix
100: const rotationMatrix = getRotationMatrix(Date.now() * 0.001);
101: const rotationMatrixLocation = gl.getUniformLocation(program, 'u_rotationMatrix');
102: gl.uniformMatrix4fv(rotationMatrixLocation, false, rotationMatrix);
103:
104: // Draw the triangle
105: gl.drawArrays(gl.TRIANGLES, 0, vertices.length / 3);
106:
107: requestAnimationFrame(render);
108: }
109:
110: render();
111:
112: // Handle window resizing
113: window.addEventListener('resize', () => {
114: canvas.width = window.innerWidth;
115: canvas.height = window.innerHeight;
116: gl.viewport(0, 0, canvas.width, canvas.height);
117: });
118:
Also we can convert Canvas to Blob:
1: canvas.toBlob(blob => {
2: console.log(blob);
3: }, 'image/webp', 0.8); // 80% quality
4:
Code uploaded to https://github.com/AAlex-11/ImageAdvanced/tree/main/WebGL
Also I collected a lot of awesome animations to my blog Best animation with MIT license
3. Three library to make animation in Canvas.
Or we can use more clear logic to WebGL and use https://threejs.org/examples/
1: // Set up the scene, camera, and renderer
2: const scene = new THREE.Scene();
3: const camera = new THREE.PerspectiveCamera(75, window.innerWidth / window.innerHeight, 0.1, 1000);
4: const renderer = new THREE.WebGLRenderer();
5: renderer.setSize(window.innerWidth, window.innerHeight);
6: document.body.appendChild(renderer.domElement);
7:
8: // Create a cube with different colored faces
9: const geometry = new THREE.BoxGeometry();
10: const materials = [
11: new THREE.MeshBasicMaterial({ color: 0xff0000 }), // Red
12: new THREE.MeshBasicMaterial({ color: 0x00ff00 }), // Green
13: new THREE.MeshBasicMaterial({ color: 0x0000ff }), // Blue
14: new THREE.MeshBasicMaterial({ color: 0xffff00 }), // Yellow
15: new THREE.MeshBasicMaterial({ color: 0xff00ff }), // Magenta
16: new THREE.MeshBasicMaterial({ color: 0x00ffff }) // Cyan
17: ];
18: const cube = new THREE.Mesh(geometry, materials);
19: cube.scale.set(3, 3, 3);
20: scene.add(cube);
21:
22: // Position the camera
23: camera.position.z = 5;
24:
25: // Add lighting (optional, for more realism)
26: const light = new THREE.DirectionalLight(0xffffff, 1);
27: light.position.set(1, 1, 1).normalize();
28: scene.add(light);
29:
30: // Animation loop
31: function animate() {
32: requestAnimationFrame(animate);
33:
34: // Rotate the cube
35: cube.rotation.x += 0.01;
36: cube.rotation.y += 0.01;
37:
38: // Render the scene
39: renderer.render(scene, camera);
40: }
41:
42: // Start the animation
43: animate();
44:
45: // Handle window resizing
46: window.addEventListener('resize', () => {
47: camera.aspect = window.innerWidth / window.innerHeight;
48: camera.updateProjectionMatrix();
49: renderer.setSize(window.innerWidth, window.innerHeight);
50: });
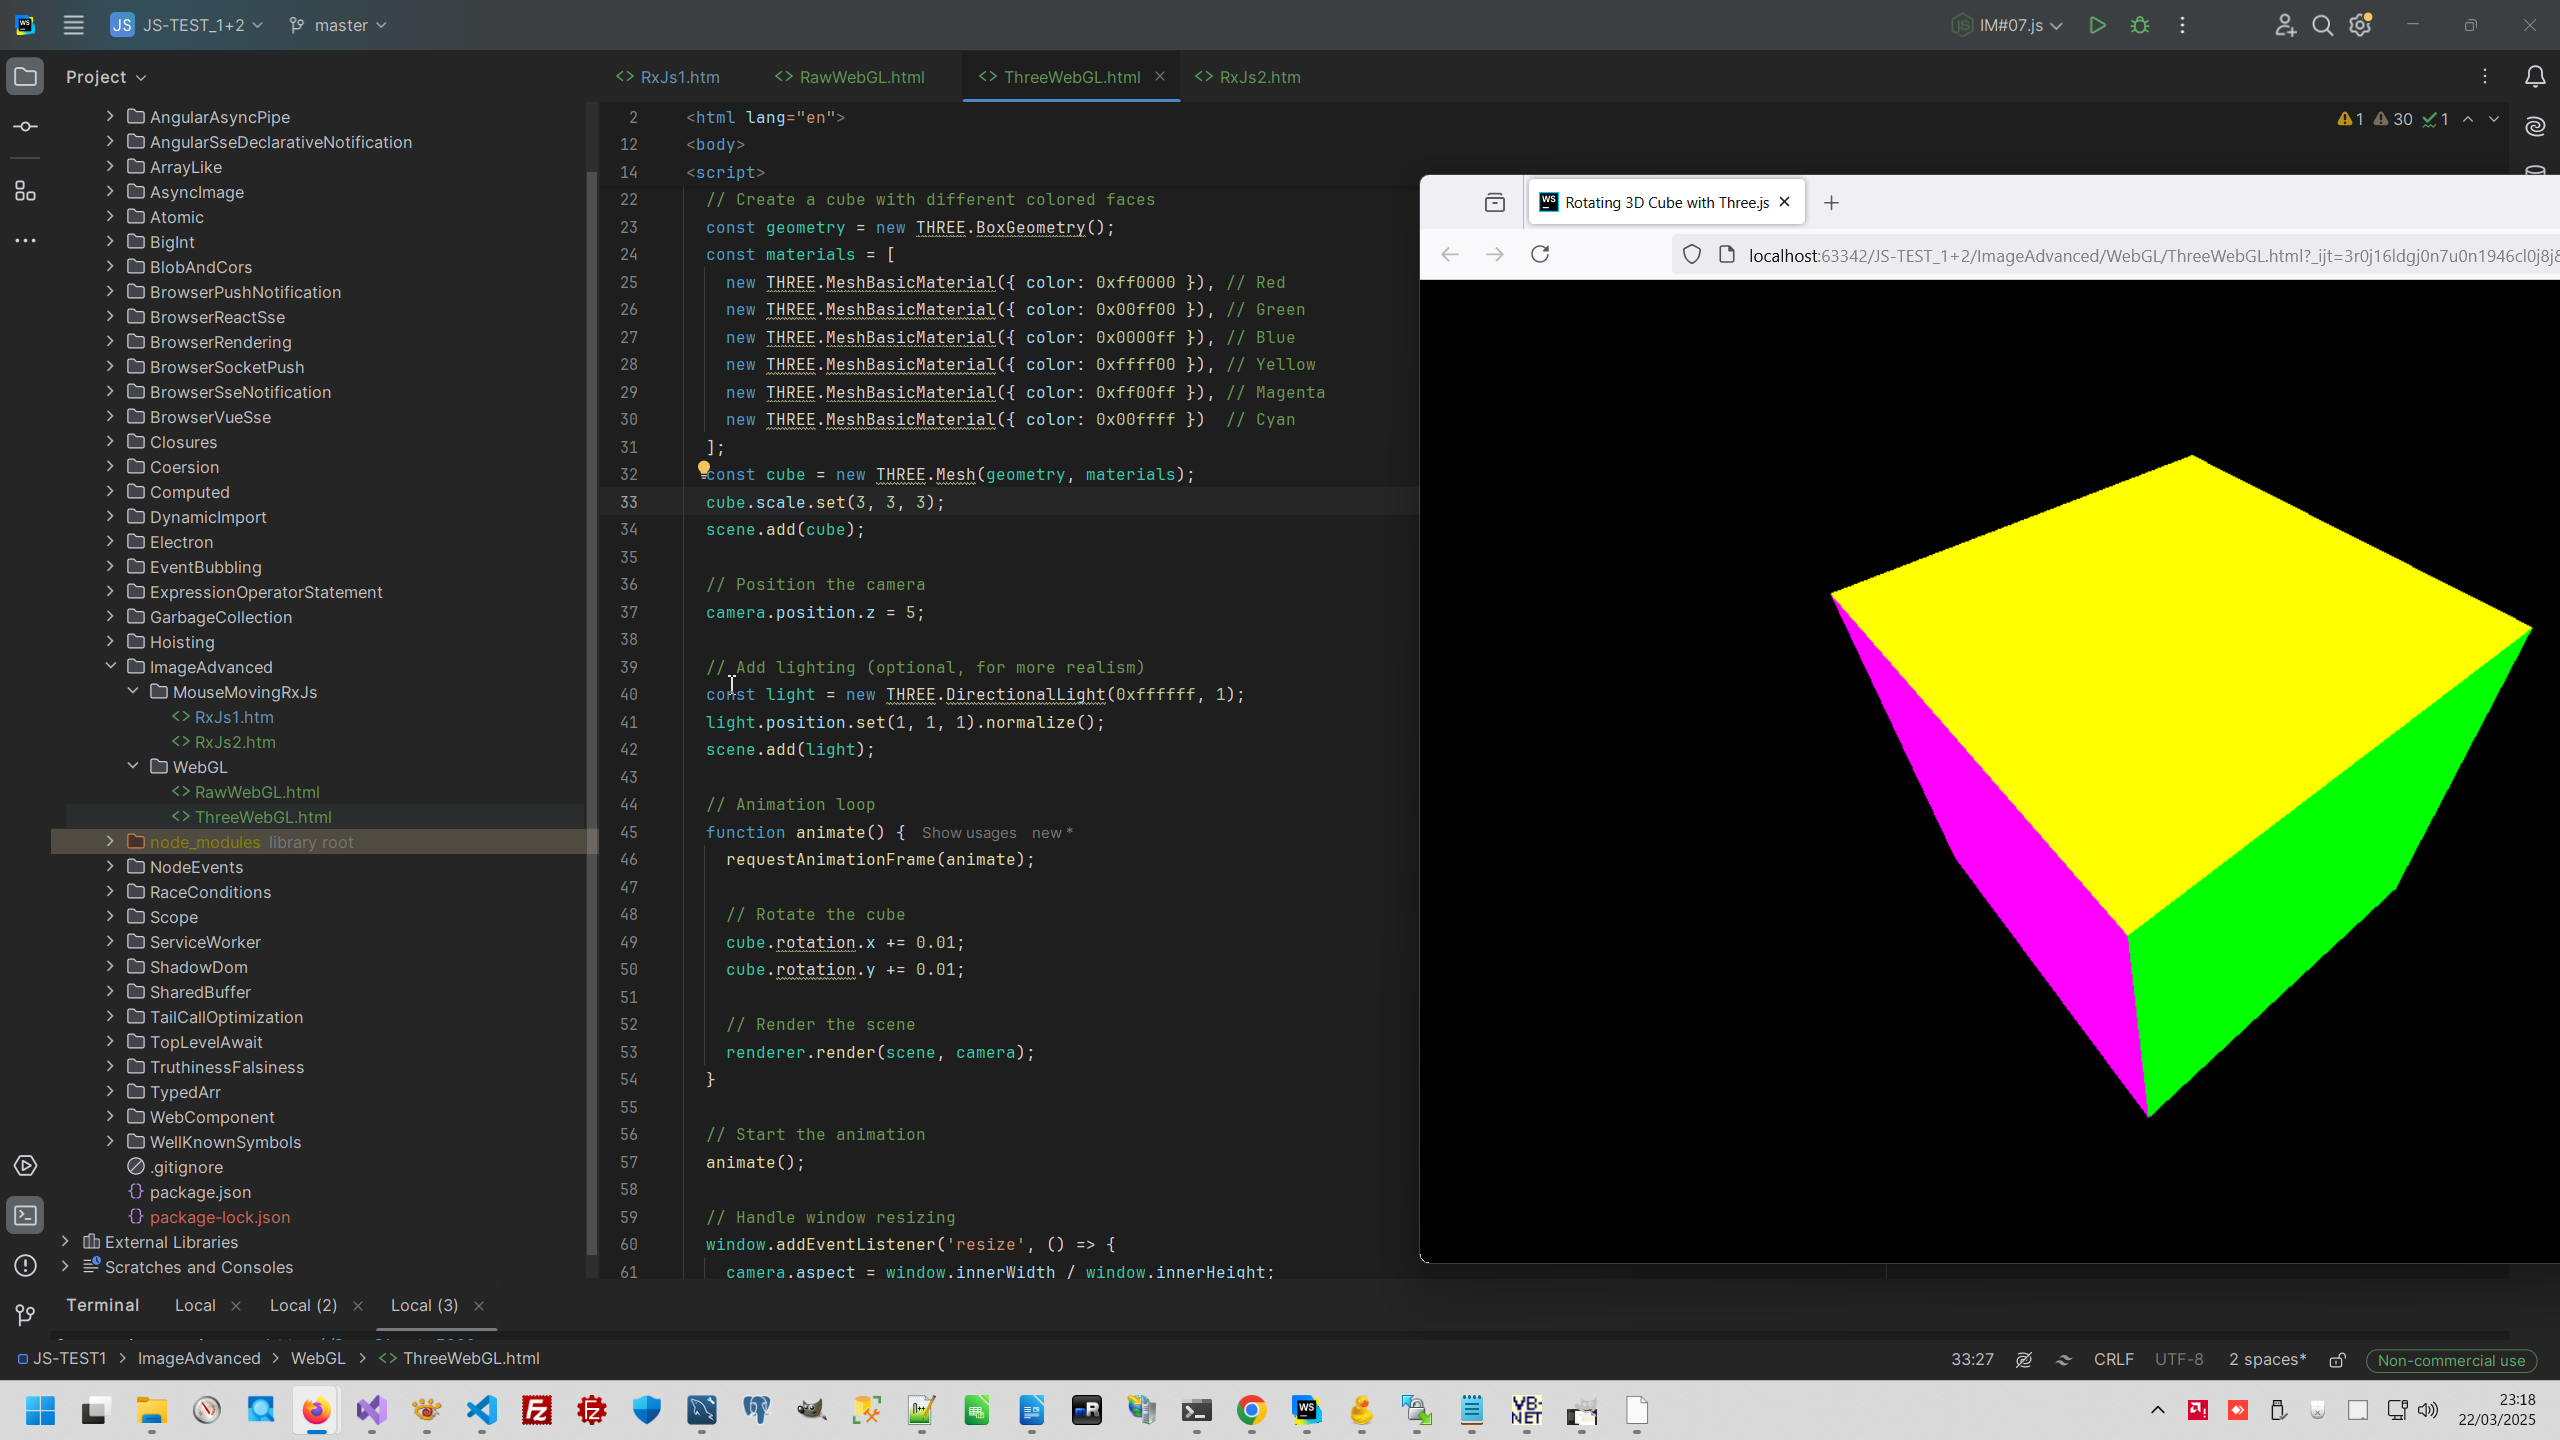
There are some libraries similar to Three.js, for example Babylon.js, glMatrix, but raw WebGL can be more performant because there’s no overhead from abstraction layers.
Code uploaded to https://github.com/AAlex-11/ImageAdvanced/tree/main/WebGL
4. Use Module bundler with Three.js
This is text rotation example, interesting that Font and other features placed to another JS module and we need to use Module bundler.
1: <!DOCTYPE html>
2: <html lang="en">
3: <head>
4: <meta charset="UTF-8">
5: <meta name="viewport" content="width=device-width, initial-scale=1.0">
6: <title>3D Text with Three.js</title>
7: <style>
8: body { margin: 0; }
9: canvas { display: block; }
10: </style>
11: </head>
12: <body>
13: <!-- Use ESM.sh for Three.js and its examples -->
14: <script type="module">
15: // Import Three.js core
16: import * as THREE from 'https://esm.sh/three';
17:
18: // Import FontLoader and TextGeometry from examples/jsm
19: import { FontLoader } from 'https://esm.sh/three/examples/jsm/loaders/FontLoader.js';
20: import { TextGeometry } from 'https://esm.sh/three/examples/jsm/geometries/TextGeometry.js';
21:
22: // Set up the scene, camera, and renderer
23: const scene = new THREE.Scene();
24: const camera = new THREE.PerspectiveCamera(75, window.innerWidth / window.innerHeight, 0.1, 1000);
25: const renderer = new THREE.WebGLRenderer();
26: renderer.setSize(window.innerWidth, window.innerHeight);
27: document.body.appendChild(renderer.domElement);
28:
29: // Add lighting
30: const light = new THREE.DirectionalLight(0xffffff, 1);
31: light.position.set(5, 5, 5).normalize();
32: scene.add(light);
33:
34: // Variable to store the text mesh
35: let textMesh;
36:
37: // Create 3D text
38: const fontLoader = new FontLoader();
39: fontLoader.load('https://threejs.org/examples/fonts/helvetiker_regular.typeface.json', function (font) {
40: const textGeometry = new TextGeometry('Hello, 3D!', {
41: font: font,
42: size: 20,
43: height: 1,
44: curveSegments: 12,
45: bevelEnabled: true,
46: bevelThickness: 0.5,
47: bevelSize: 0.3,
48: bevelOffset: 0,
49: bevelSegments: 5
50: });
51:
52: // Center the text geometry
53: textGeometry.center();
54:
55: const textMaterial = new THREE.MeshPhongMaterial({ color: 0xff00ff });
56: textMesh = new THREE.Mesh(textGeometry, textMaterial);
57: textMesh.position.set(0, 0, -50); // Position the text further away
58: scene.add(textMesh);
59: });
60:
61: // Position the camera
62: camera.position.z = 50; // Move the camera back
63: camera.position.y = 20; // Move the camera slightly higher
64: camera.lookAt(0, 0, -50); // Make the camera look at the text
65:
66: // Animation loop
67: function animate() {
68: requestAnimationFrame(animate);
69:
70: // Rotate the text if it exists
71: if (textMesh) {
72: textMesh.rotation.y += 0.01; // Rotate only around the Y-axis
73: }
74:
75: renderer.render(scene, camera);
76: }
77: animate();
78:
79: // Handle window resizing
80: window.addEventListener('resize', () => {
81: camera.aspect = window.innerWidth / window.innerHeight;
82: camera.updateProjectionMatrix();
83: renderer.setSize(window.innerWidth, window.innerHeight);
84: });
85: </script>
86: </body>
87: </html>
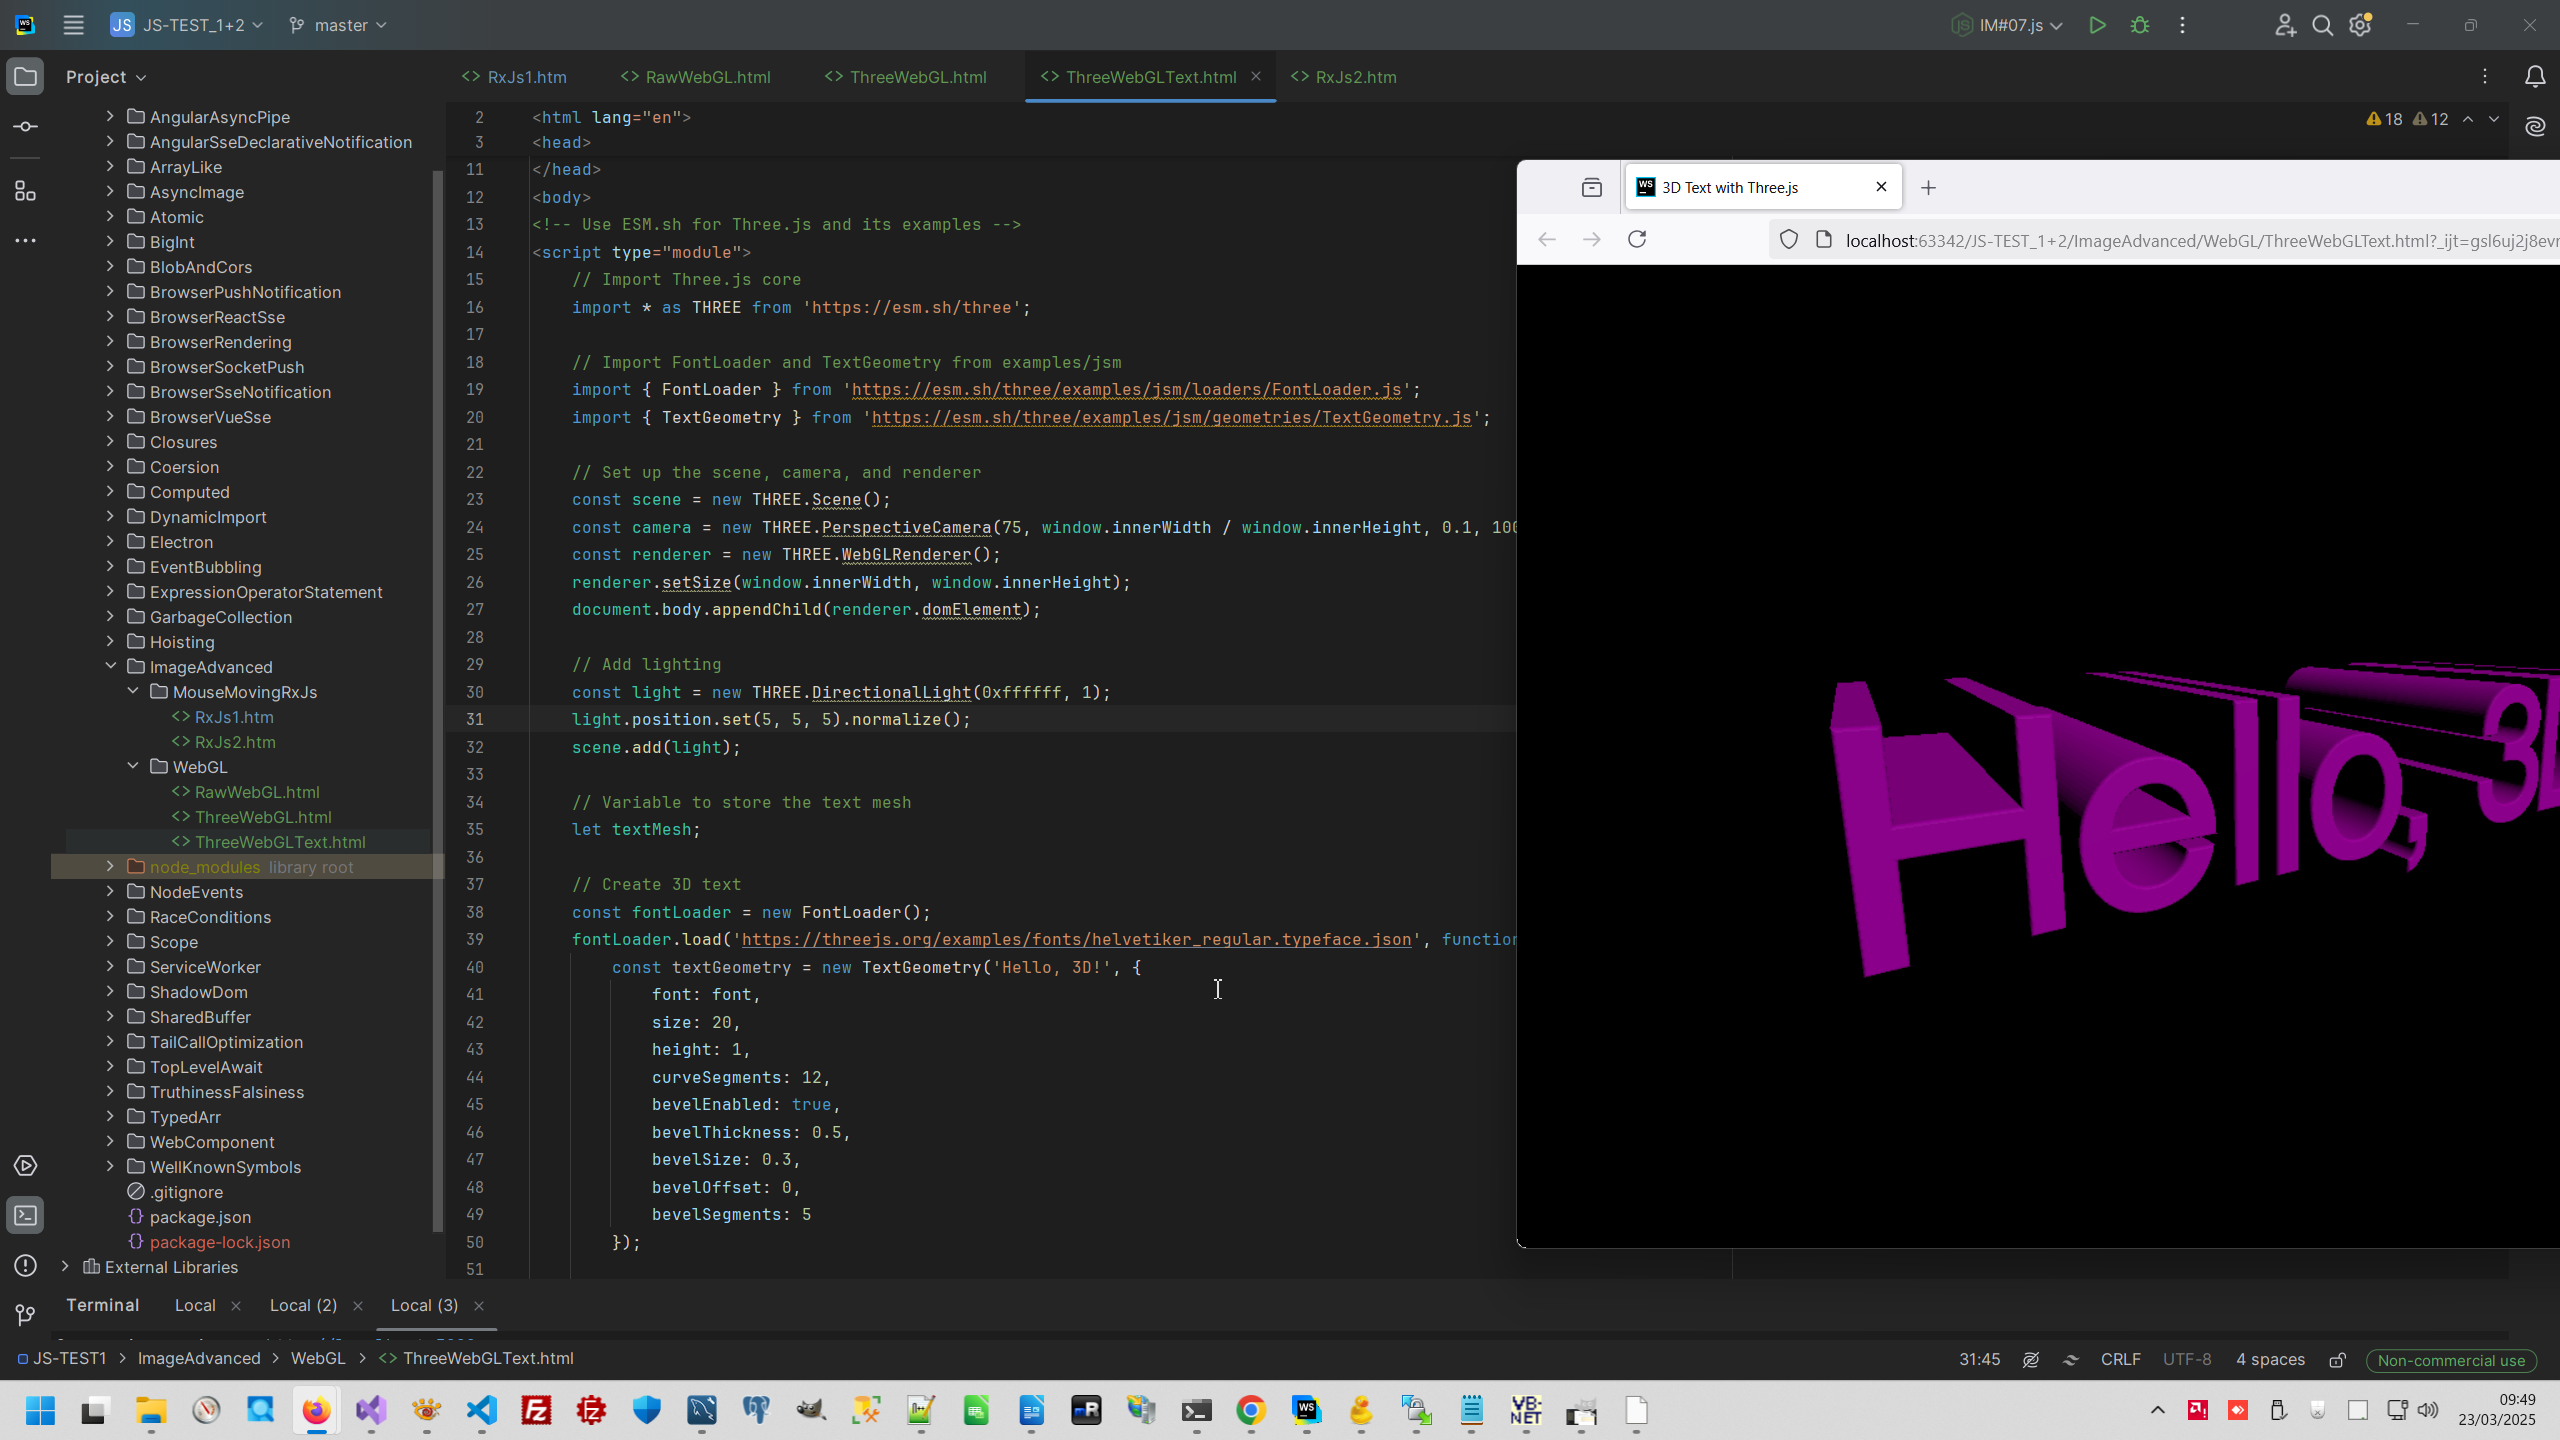
Code uploaded to https://github.com/AAlex-11/ImageAdvanced/tree/main/WebGL
5. Protect your privacy with EXIF.
Various fucking services Main internet companies what transformed internet to hell: Microsoft, Google, Payoneer, Paypal, Upwork, Freelancer, Linkedin, Huobi/HTX, Strip, Hetzner. try to collect information about your. But wha right has that fucking service to collect information about you? In the of that funking services we can see unscrupulous man who want to know more than he has right to know.
Therefore, I never load to malicious rogue services my real documents. Problem that usually editing photo and documents number pass tail in EXIF. And in my blog we already can read various recipe how to protect yourself from intrusion to your privacy How to change image Exif metadata, because malicious rogue services always start checking documents from EXIF.
1: document.getElementById('imageInput').addEventListener('change', function (event) {
2: const file = event.target.files[0];
3: if (file) {
4: EXIF.getData(file, function () {
5: let exif = EXIF.getAllTags(this);
6: document.getElementById('exifData').textContent = JSON.stringify(exif, null, 2);
7:
8: // Modify EXIF data (example: change the description)
9: exif.ImageDescription = 'Modified by JavaScript';
10: EXIF.setData(file, exif, function () {
11: console.log('EXIF data modified:', EXIF.getAllTags(this));
12: });
13: });
14: }
15: });
16:
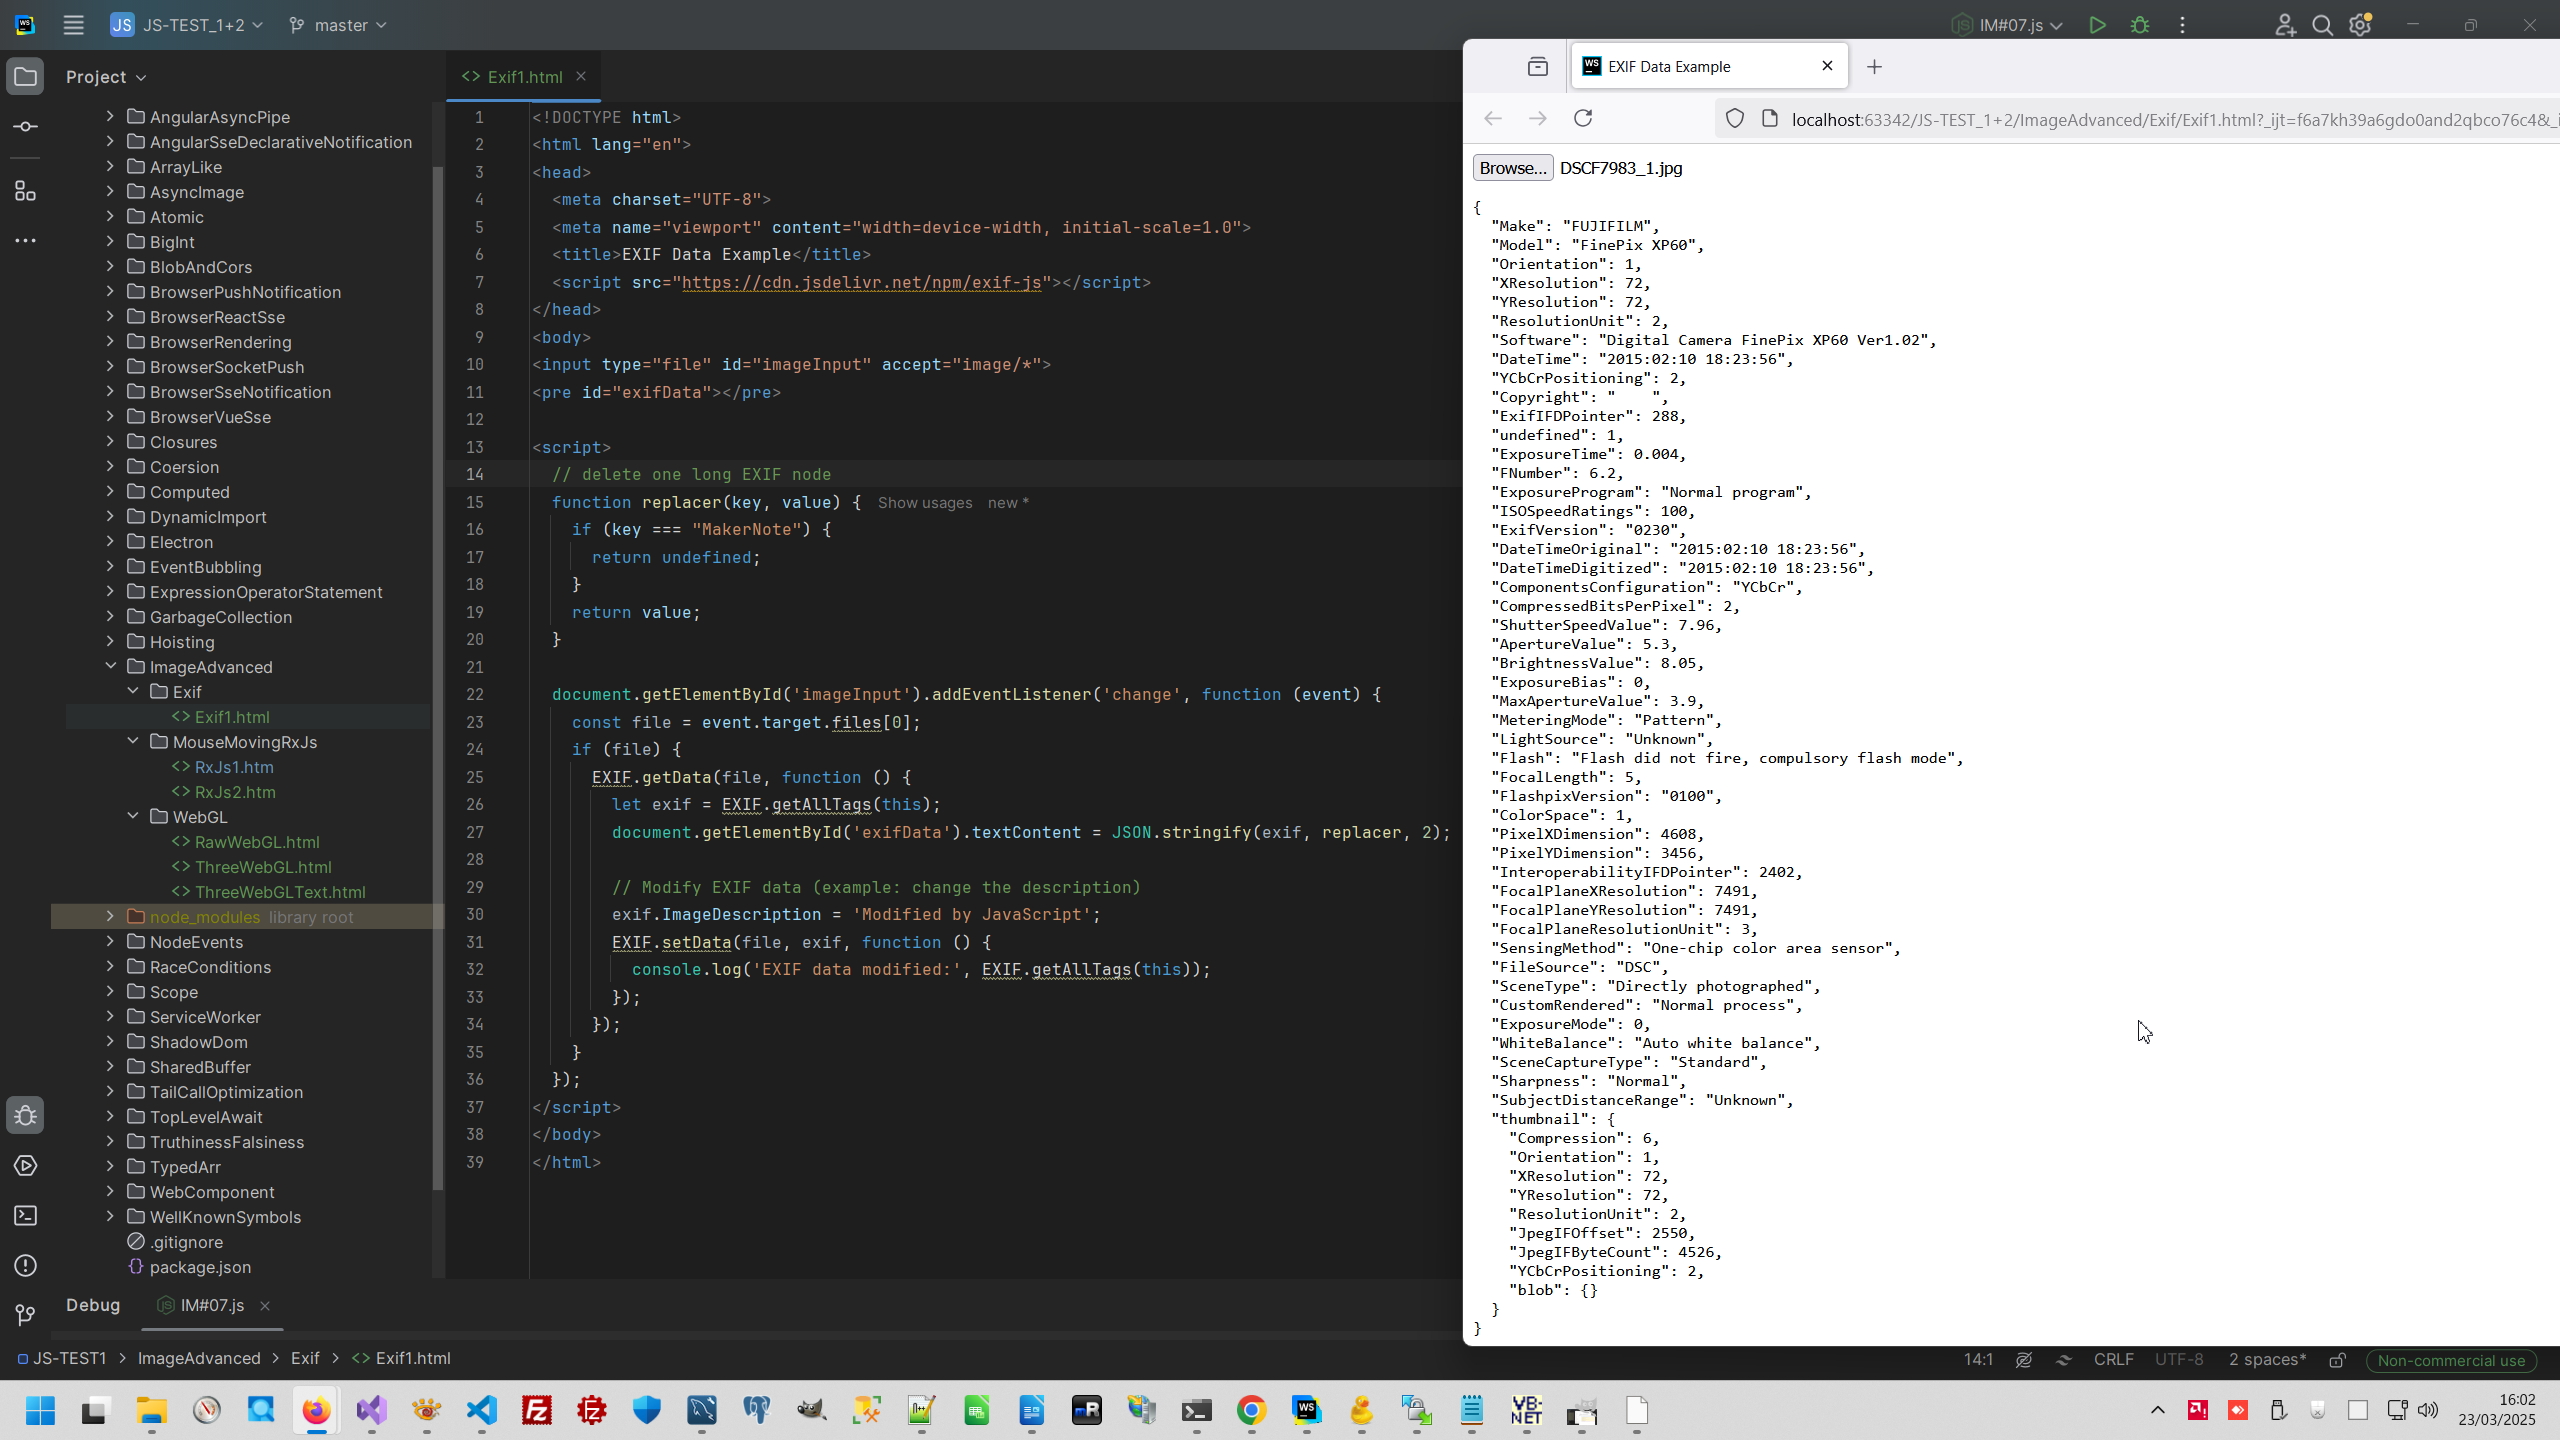
Code uploaded to https://github.com/AAlex-11/ImageAdvanced/tree/main/Exif
6. Drag-And-Drop image.
I have a lot of various examples in Desktop Drag-and-Drop, for example DragAndDrop DataGridView Row, Drag-and-Drop (this is 2004 years!) but still has no any Drag-And-Drop code in Browser.
1:
2: //<div id="dropZone">Drop an image here</div>
3: //<img id="preview" src="#" alt="Preview" style="display: none; max-width: 100%; margin-top:10px" />
4:
5: const dropZone = document.getElementById('dropZone');
6: const preview = document.getElementById('preview');
7:
8: dropZone.addEventListener('dragover', (event) => {
9: event.preventDefault();
10: dropZone.style.borderColor = 'blue';
11: });
12:
13: dropZone.addEventListener('dragleave', () => {
14: dropZone.style.borderColor = '#ccc';
15: });
16:
17: dropZone.addEventListener('drop', (event) => {
18: event.preventDefault();
19: dropZone.style.borderColor = '#ccc';
20:
21: const file = event.dataTransfer.files[0];
22: if (file && file.type.startsWith('image/')) {
23: const reader = new FileReader();
24: reader.onload = function (e) {
25: preview.src = e.target.result;
26: preview.style.display = 'block';
27: };
28: reader.readAsDataURL(file);
29: }
30: });
31:
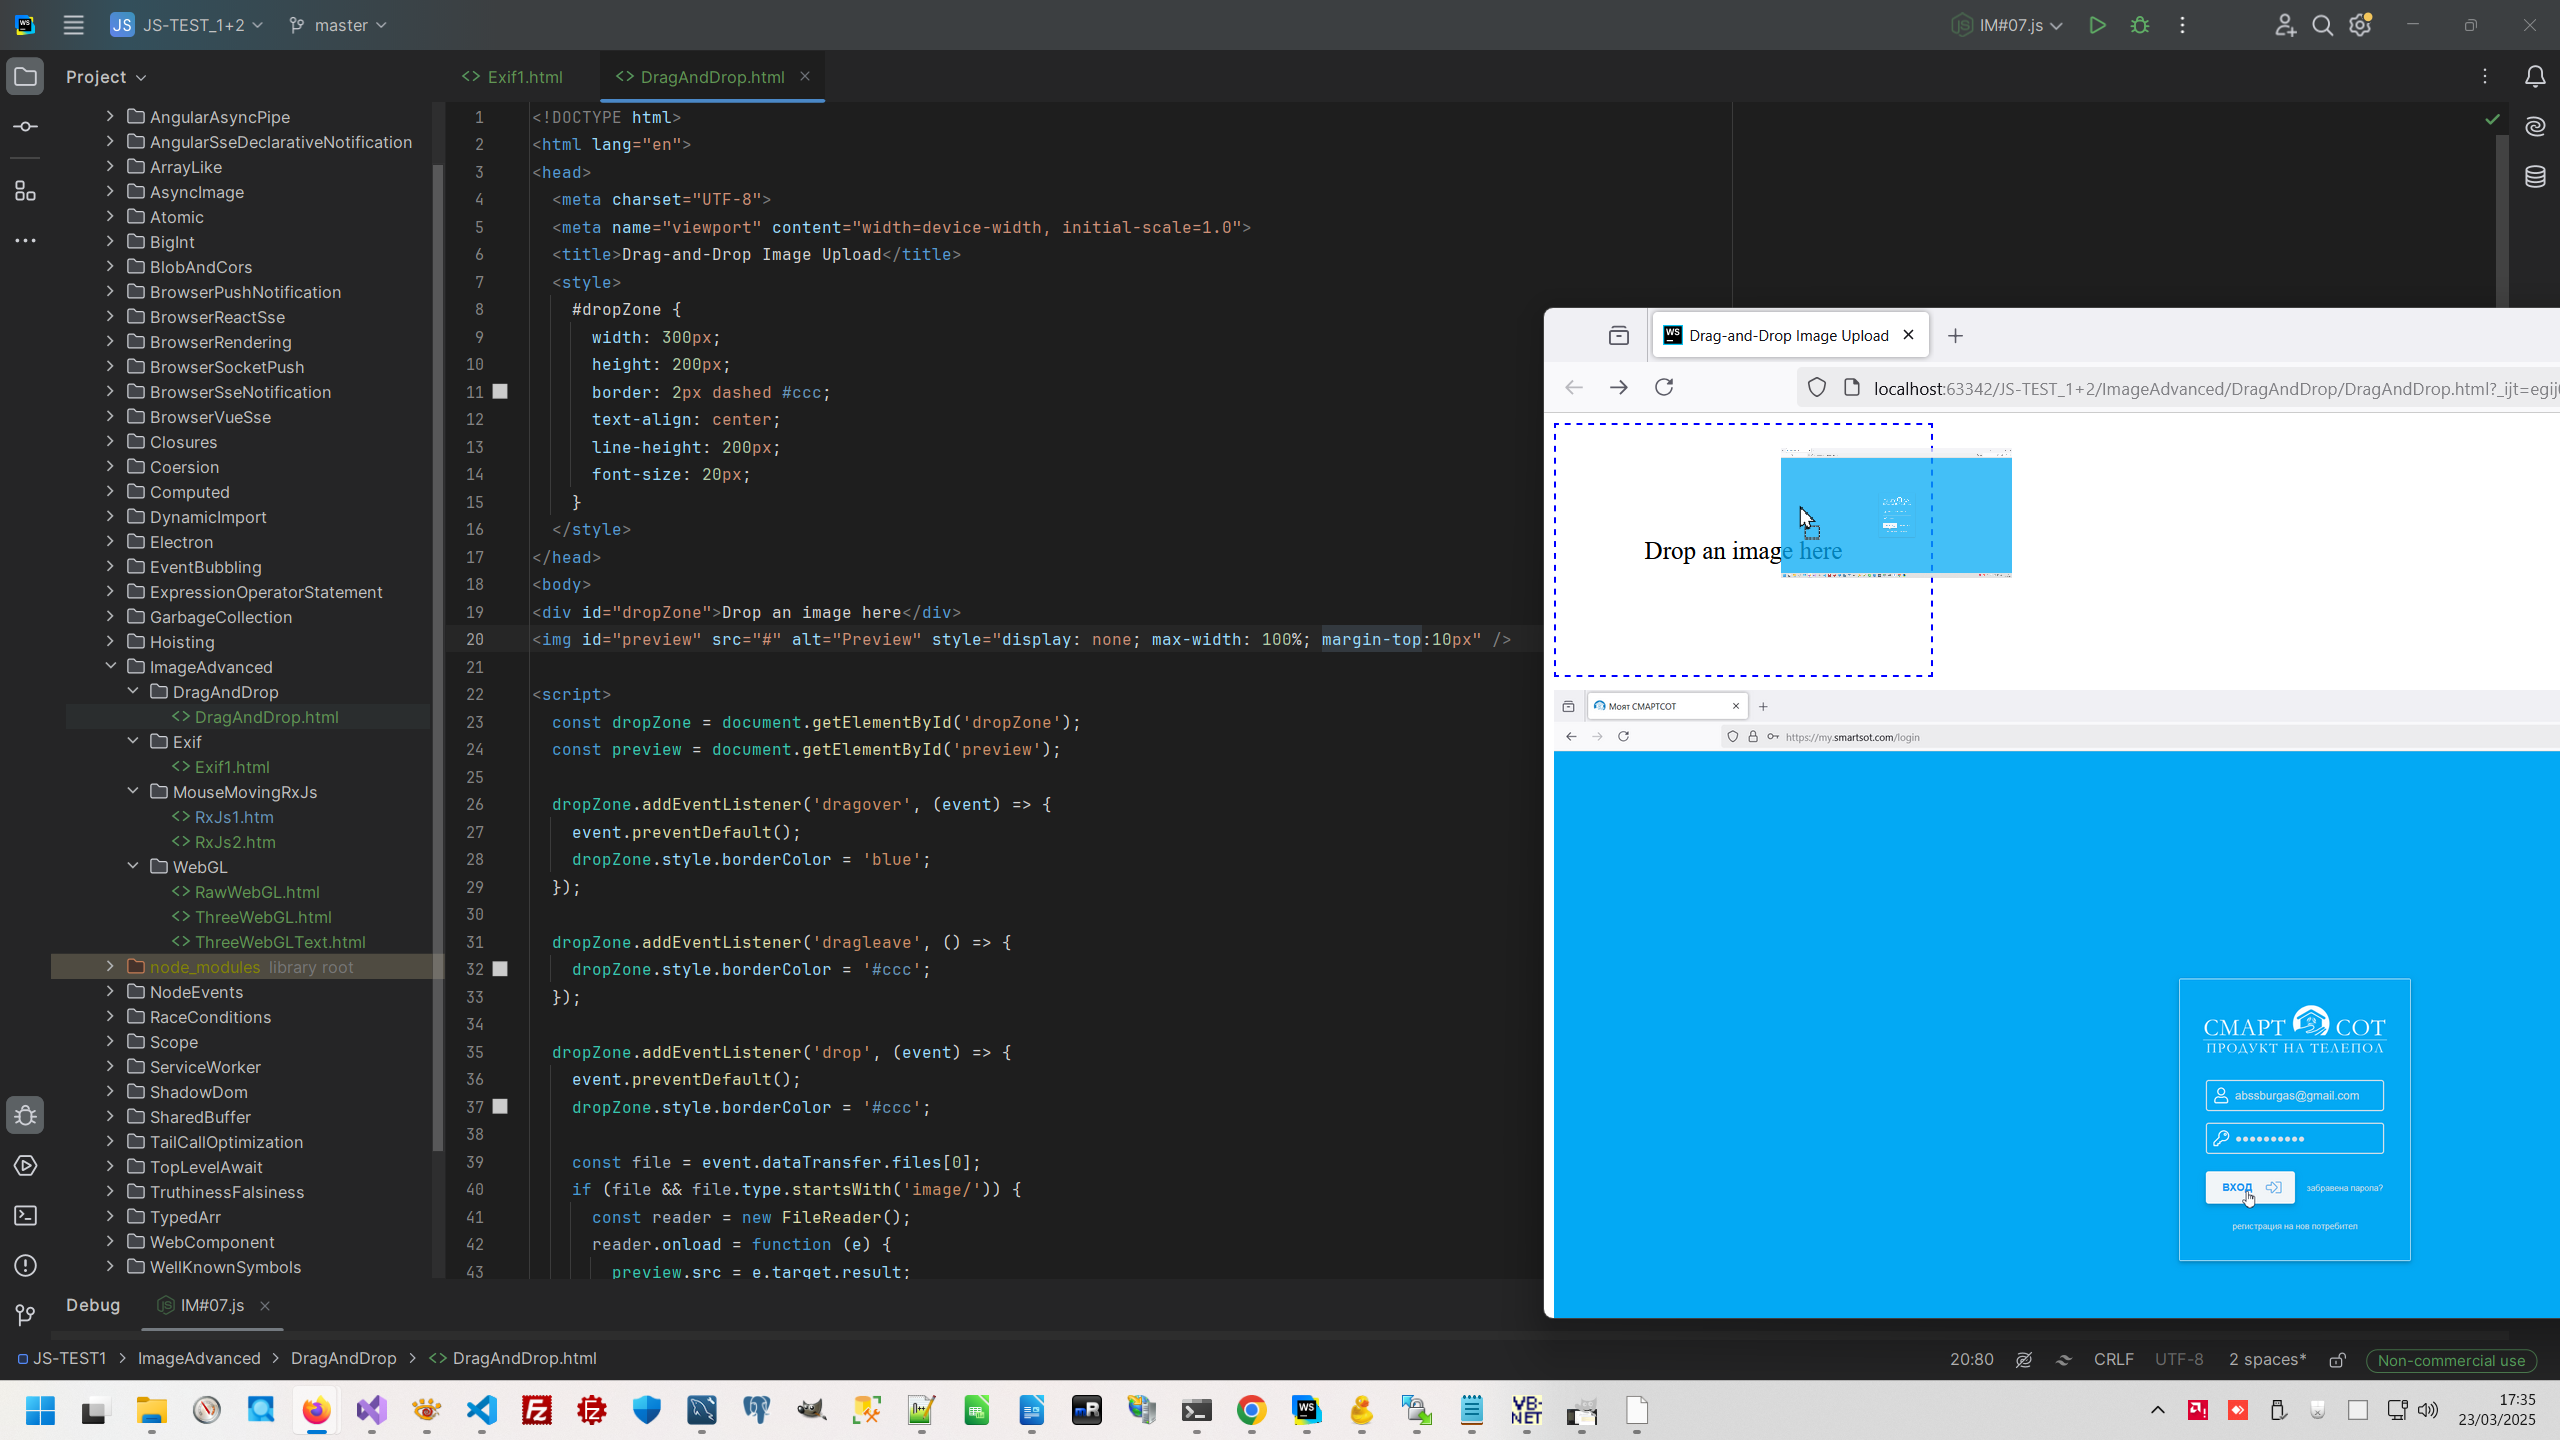
Code uploaded to https://github.com/AAlex-11/ImageAdvanced/tree/main/DragAndDrop
7. OCR (Optical Character Recognition).
This is very importand part to working with Images, I also have a lot of topic with the same descriptions, for example Tesseract OCR Project template
1: //<input type="file" id="imageInput" accept="image/*">
2: //<pre id="output">Results will appear here...</pre>
3:
4: document.getElementById('imageInput').addEventListener('change', function (event) {
5: const file = event.target.files[0];
6: if (file) {
7: const output = document.getElementById('output');
8: output.textContent = 'Processing...';
9:
10: Tesseract.recognize(
11: file,
12: 'eng', // Language (English)
13: {
14: logger: m => console.log(m), // Log progress
15: }
16: )
17: .then(result => {
18: console.log(result); // Log the entire result object
19: if (result && result.data && result.data.text) {
20: output.textContent = result.data.text; // Access text from result.data
21: } else {
22: output.textContent = 'No text detected or result is undefined.';
23: }
24: })
25: .catch(error => {
26: output.textContent = 'Error: ' + error.message;
27: console.error('Error:', error);
28: });
29: }
30: });
31:
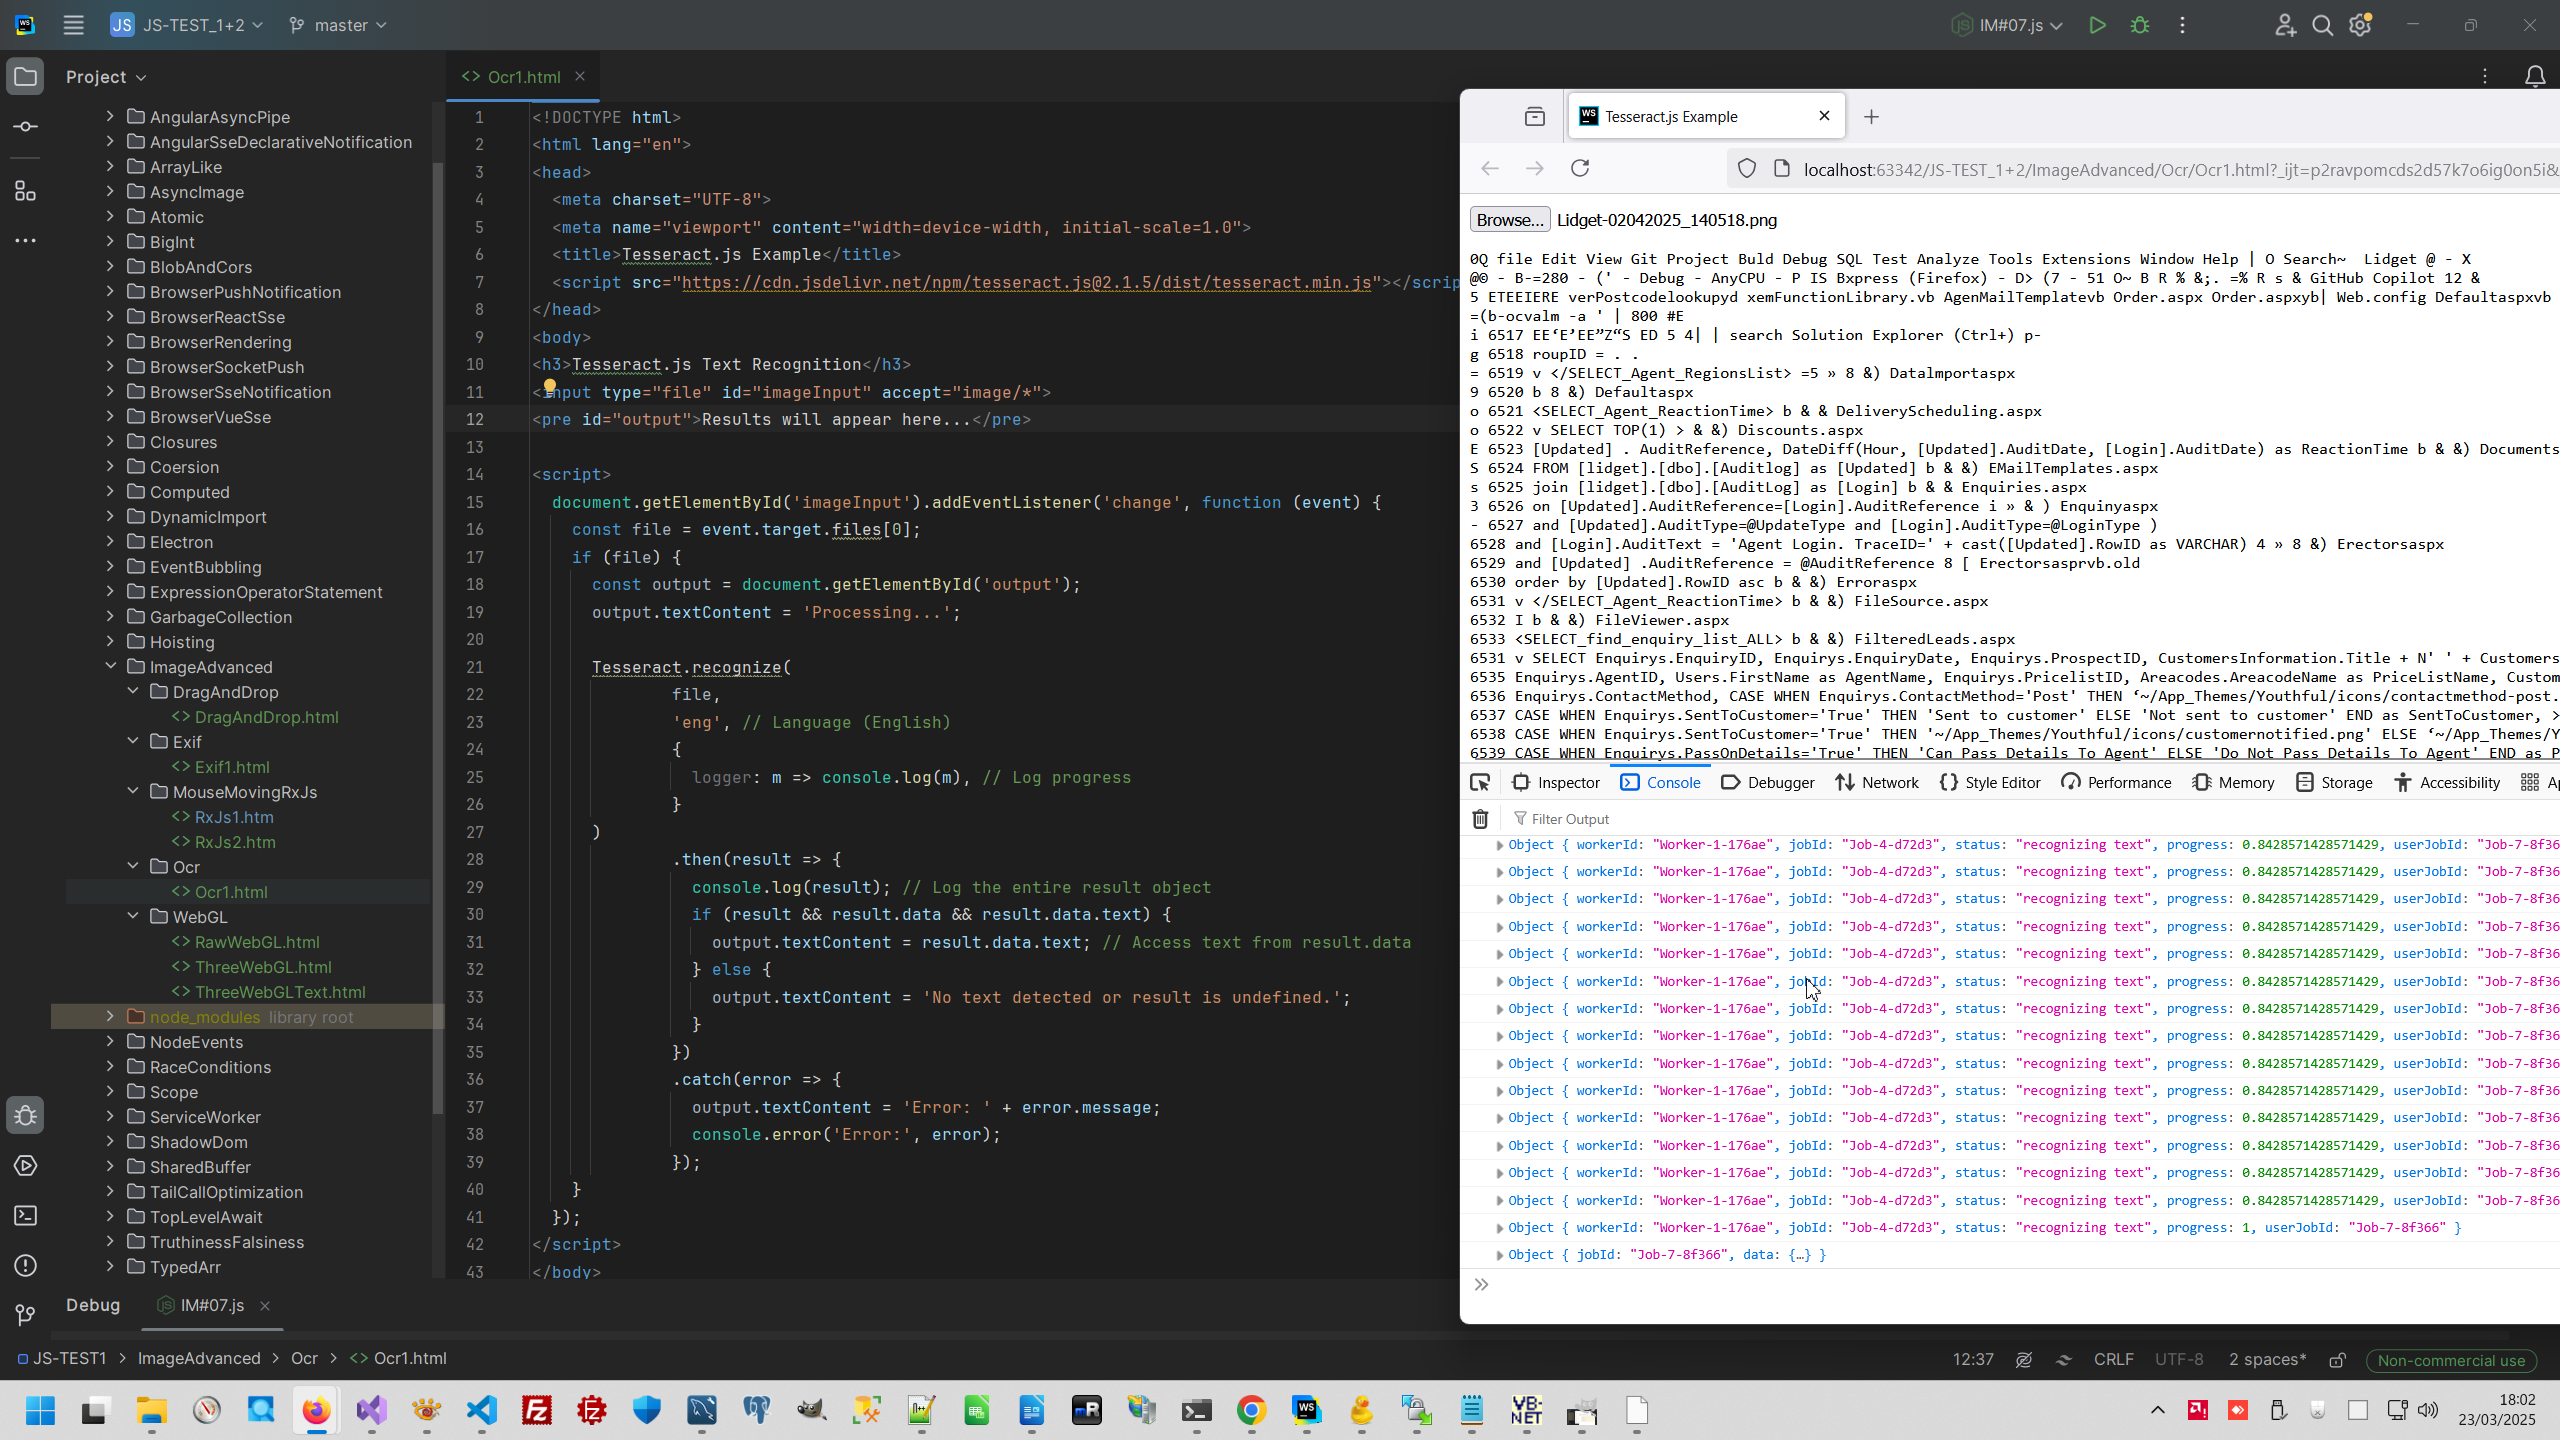
Code uploaded to https://github.com/AAlex-11/ImageAdvanced/tree/main/Ocr
8. Steganography - hiding data within an image.
This is hidden technology, I even can not see clear documentation about this, all links was deleted in internet, only stupid idiot write about this important technique.
But this is most important information about this technology.
How Least Significant Bit (LSB) works:
- In digital images, each pixel is represented by a set of bits (e.g., 24-bit color images use 8 bits for each of the Red, Green, and Blue channels).
- The LSB method involves replacing the least significant bit of each pixel's color channel with a bit from the secret message.
- Since the LSB has the smallest impact on the overall color, the changes are usually imperceptible to the human eye.
- Example: Original pixel value (8-bit): 11010110 (214 in decimal). Secret bit to hide: 1. Modified pixel value: 11010111 (215 in decimal). The change is minimal and hard to detect visually.
Usually Image has sophisticates structure, for example for PNG:
- PNG Signature (8 bytes)
- IHDR Chunk (25 bytes)
- Width: 4 bytes
- Height: 4 bytes
- Bit depth: 1 byte
- Color type: 1 byte
- Compression method: 1 byte
- Filter method: 1 byte
- Interlace method: 1 byte
- CRC: 4 bytes
- PLTE Chunk (Optional)
- IDAT Chunk (Compressed image data)
- IEND Chunk (0 bytes)
We can see this image structure in any HEX editor. But if Image loaded to Canvas and ctx.getImageData() we receive Uint8ClampedArray one-dimensional array of pixel data where each pixel is represented by 4 values in the array
- Red (0–255)
- Green (0–255)
- Blue (0–255)
- Alpha (0–255, where 0 is fully transparent and 255 is fully opaque).
And:
- The array length is 4 * width * height.
- The width of the image data in pixels.
- The height of the image data in pixels
Therefore Steganography is no more then binary manipulations of bits:
1: const canvas = document.getElementById('canvas');
2: const ctx = canvas.getContext('2d');
3:
4: // Function to test message storage and retrieval
5: document.getElementById('testMessage').addEventListener('click', function () {
6: const file = document.getElementById('imageInput').files[0];
7:
8: if (file) {
9: const img = new Image();
10: img.src = URL.createObjectURL(file);
11: img.onload = function () {
12: canvas.width = img.width;
13: canvas.height = img.height;
14: ctx.drawImage(img, 0, 0);
15:
16: const imageData = ctx.getImageData(0, 0, canvas.width, canvas.height);
17: const data = imageData.data;
18:
19: const messageToStore = document.getElementById('secretText').value;
20: const binaryText = messageToStore.split('').map(char => char.charCodeAt(0).toString(2).padStart(8, '0')).join('');
21: console.log("Message to Store (Binary):", binaryText);
22:
23: // Store the length of the message (in bits) in the first 16 pixels (16 bits)
24: const lengthBinary = binaryText.length.toString(2).padStart(16, '0');
25: console.log("Length Binary:", lengthBinary);
26: for (let i = 0; i < 16; i++) {
27: const bit = lengthBinary[i];
28: const pixelIndex = i * 4; // Access the red channel (R) of each pixel
29: data[pixelIndex] = (data[pixelIndex] & 0xFE) | parseInt(bit, 2); // Modify LSB of the red channel
30: console.log(`Storing Length - Pixel ${i}: ${data[pixelIndex].toString(2).padStart(8, '0')} Bit: ${bit}`);
31: }
32:
33: // Hide the actual message in the LSB of the red channel
34: for (let i = 0; i < binaryText.length; i++) {
35: const bit = binaryText[i];
36: const pixelIndex = (i + 16) * 4; // Start after the length bits, access the red channel (R)
37: data[pixelIndex] = (data[pixelIndex] & 0xFE) | parseInt(bit, 2); // Modify LSB of the red channel
38: console.log(`Hiding Data - Pixel ${i + 16}: ${data[pixelIndex].toString(2).padStart(8, '0')} Bit: ${bit}`);
39: }
40:
41: ctx.putImageData(imageData, 0, 0);
42:
43: // Read the length of the hidden message (first 16 bits)
44: let retrievedLengthBinary = '';
45: for (let i = 0; i < 16; i++) {
46: const pixelIndex = i * 4; // Access the red channel (R) of each pixel
47: const bit = data[pixelIndex] & 1; // Extract LSB of the red channel
48: retrievedLengthBinary += bit.toString();
49: console.log(`Reading Length - Pixel ${i}: ${data[pixelIndex].toString(2).padStart(8, '0')} Bit: ${bit}`);
50: }
51: const retrievedLength = parseInt(retrievedLengthBinary, 2);
52: console.log("Retrieved Length (Binary):", retrievedLengthBinary);
53: console.log("Retrieved Length (Decimal):", retrievedLength);
54:
55: // Read the hidden message based on the length
56: let retrievedBinaryText = '';
57: for (let i = 0; i < retrievedLength; i++) {
58: const pixelIndex = (i + 16) * 4; // Start after the length bits, access the red channel (R)
59: const bit = data[pixelIndex] & 1; // Extract LSB of the red channel
60: retrievedBinaryText += bit.toString();
61: console.log(`Reading Data - Pixel ${i + 16}: ${data[pixelIndex].toString(2).padStart(8, '0')} Bit: ${bit}`);
62: }
63: console.log("Retrieved Binary Text:", retrievedBinaryText);
64:
65: // Convert binary to text
66: let retrievedText = '';
67: for (let i = 0; i < retrievedBinaryText.length; i += 8) {
68: const byte = retrievedBinaryText.substr(i, 8);
69: retrievedText += String.fromCharCode(parseInt(byte, 2));
70: }
71: console.log("Hidden Text:", retrievedText);
72:
73: // Display the retrieved text
74: const retrievedTextElement = document.getElementById('retrievedText');
75: retrievedTextElement.textContent = "Hidden Text: " + retrievedText;
76: retrievedTextElement.style.display = 'block';
77:
78: // Verify if the retrieved message matches the stored message
79: if (retrievedText === messageToStore) {
80: console.log("Test Passed: Retrieved message matches stored message.");
81: } else {
82: console.error("Test Failed: Retrieved message does not match stored message.");
83: }
84:
85: // Display the modified image
86: const output = document.getElementById('output');
87: output.src = canvas.toDataURL();
88: output.style.display = 'block';
89: };
90: } else {
91: alert("Please select an image to test message storage and retrieval.");
92: }
93: });
94:
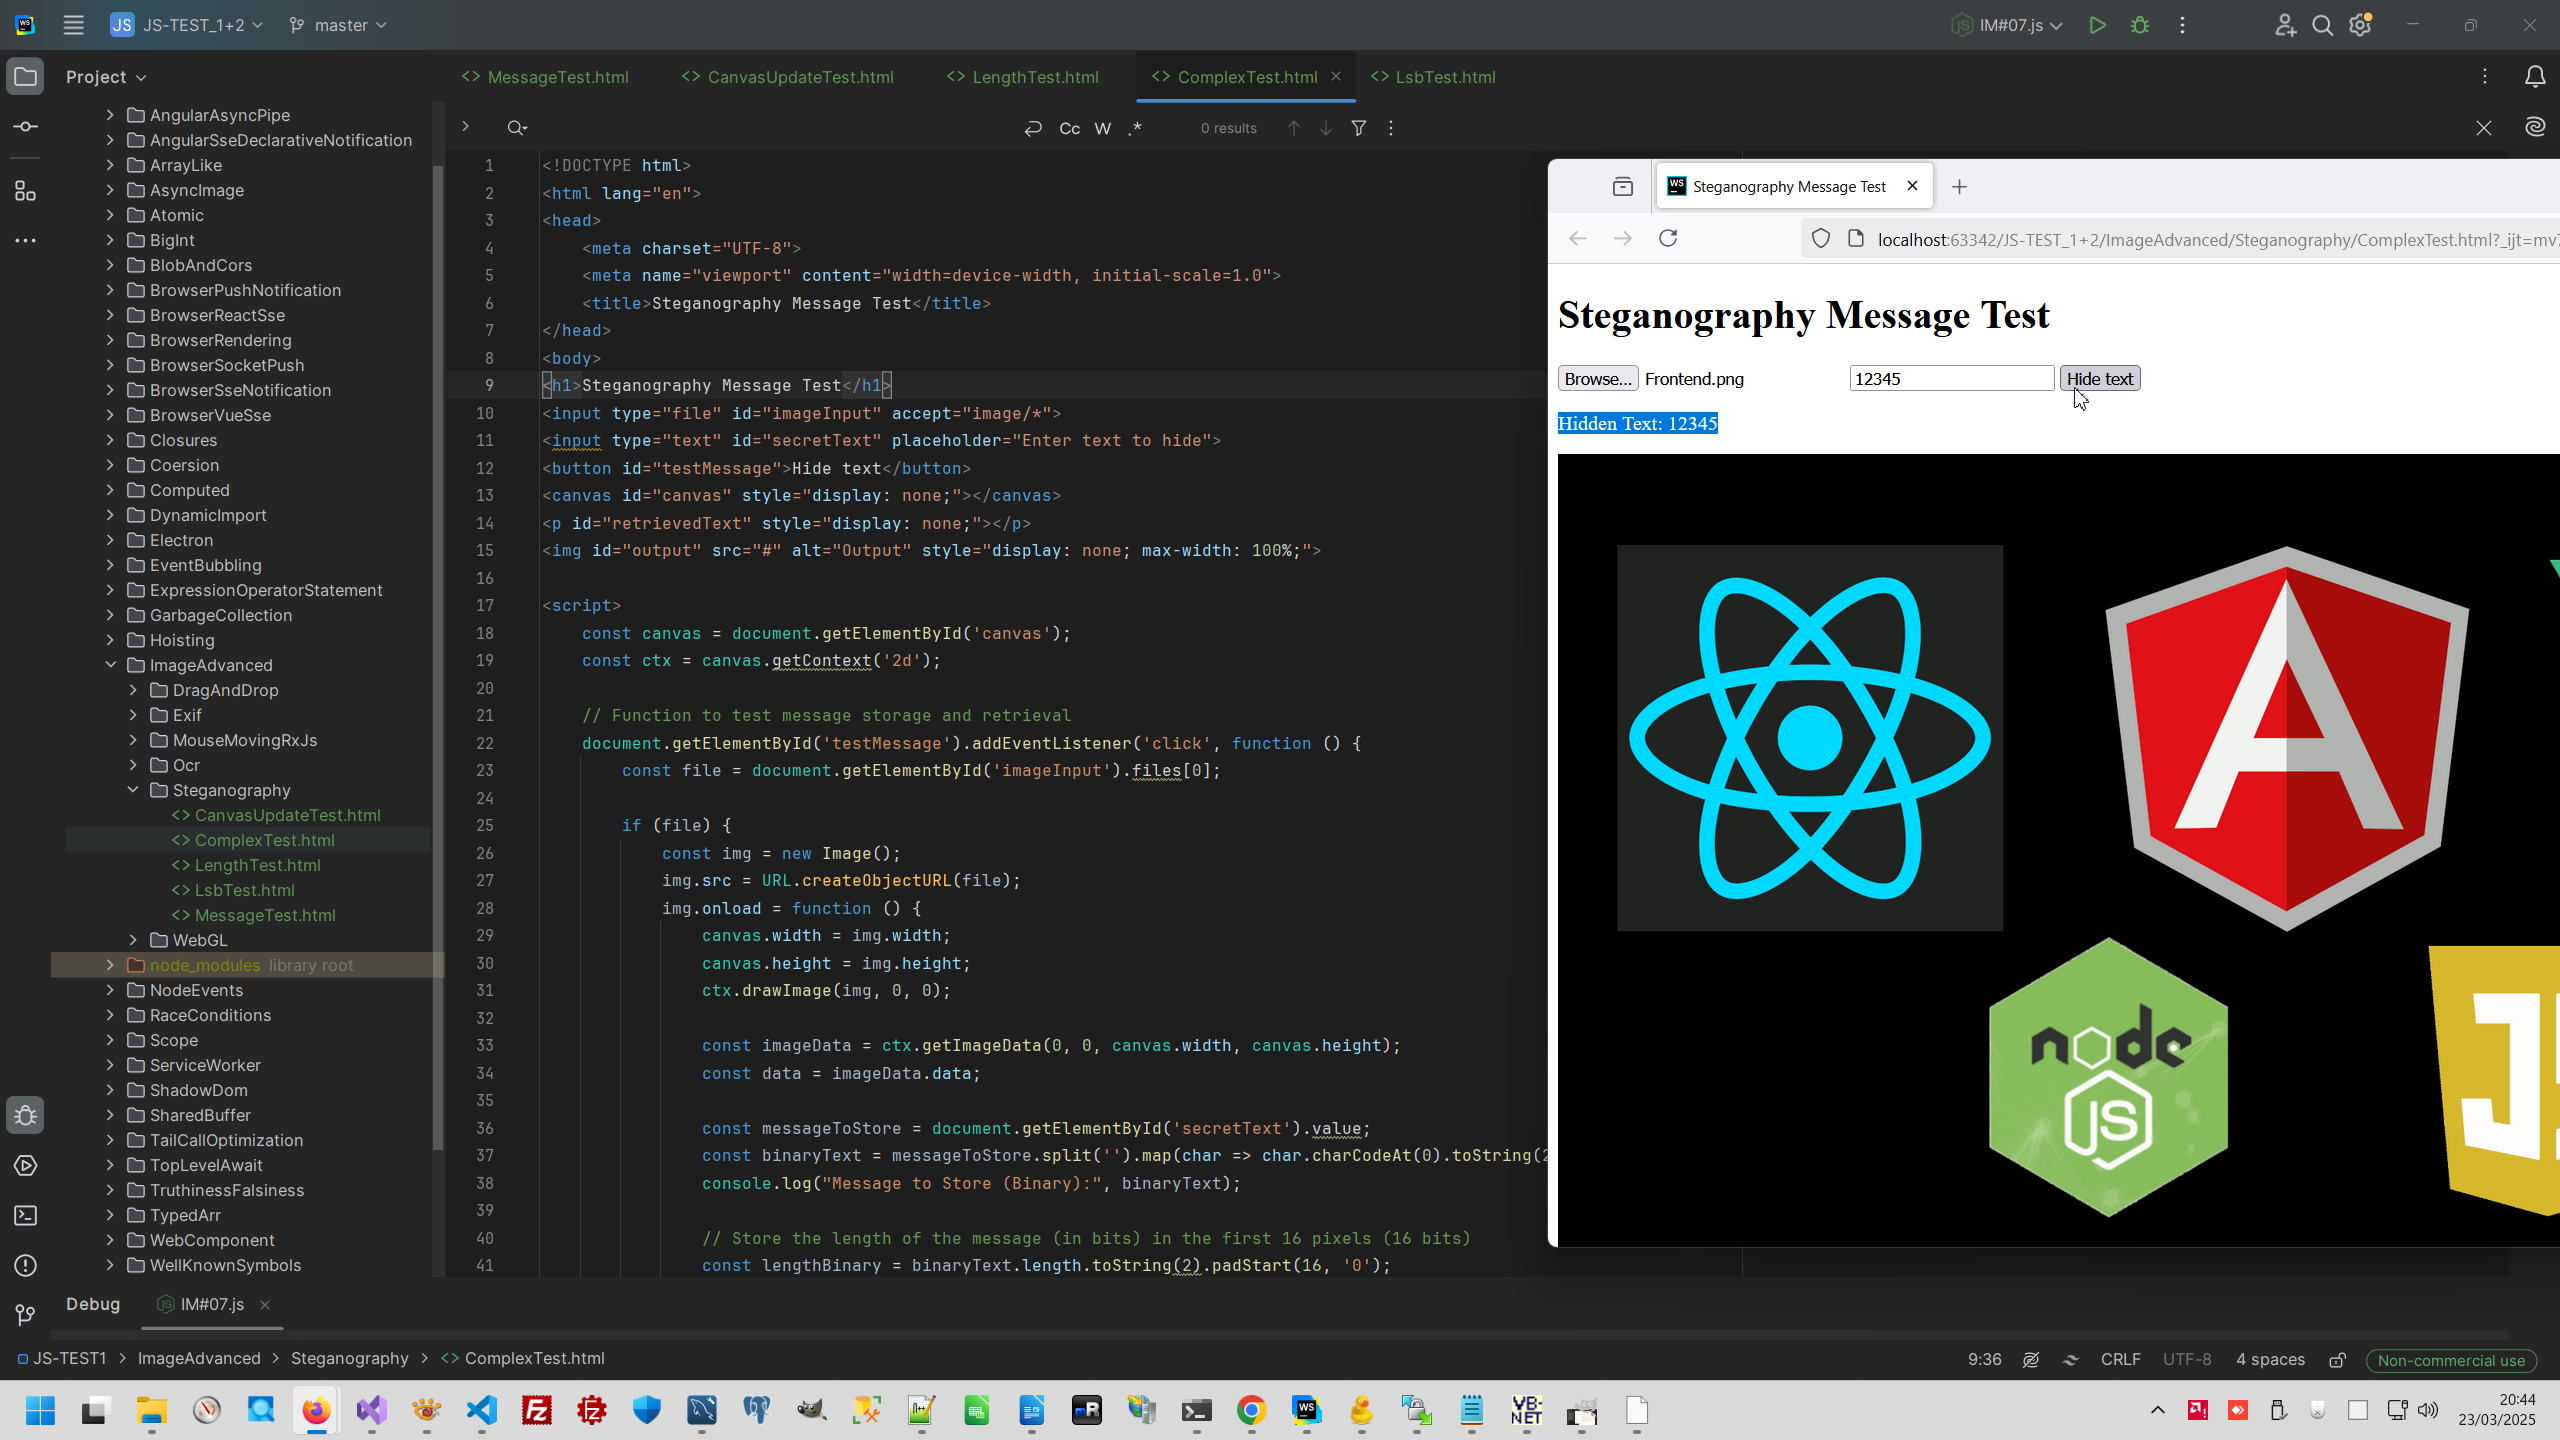
Code uploaded to https://github.com/AAlex-11/ImageAdvanced/tree/main/Steganography
9. Write Histogram in Browser.
1: // Sample data
2: const data = [10, 20, 15, 35, 25, 30, 40, 50, 45, 20, 10, 5];
3:
4: // Canvas setup
5: const canvas = document.getElementById('histogramCanvas');
6: const ctx = canvas.getContext('2d');
7: const width = canvas.width;
8: const height = canvas.height;
9: const barWidth = 40;
10: const gap = 10;
11: const maxDataValue = Math.max(...data);
12:
13: // Function to draw the histogram
14: function drawHistogram() {
15: ctx.clearRect(0, 0, width, height);
16:
17: data.forEach((value, index) => {
18: const barHeight = (value / maxDataValue) * (height - 50);
19: const x = index * (barWidth + gap) + 50;
20: const y = height - barHeight - 20;
21:
22: ctx.fillStyle = 'blue';
23: ctx.fillRect(x, y, barWidth, barHeight);
24:
25: ctx.fillStyle = 'black';
26: ctx.fillText(value, x + barWidth / 2 - 5, y - 5);
27: });
28:
29: // Draw axes
30: ctx.beginPath();
31: ctx.moveTo(40, height - 20);
32: ctx.lineTo(width, height - 20);
33: ctx.moveTo(40, height - 20);
34: ctx.lineTo(40, 20);
35: ctx.strokeStyle = 'black';
36: ctx.stroke();
37: }
38:
39: drawHistogram();
40:
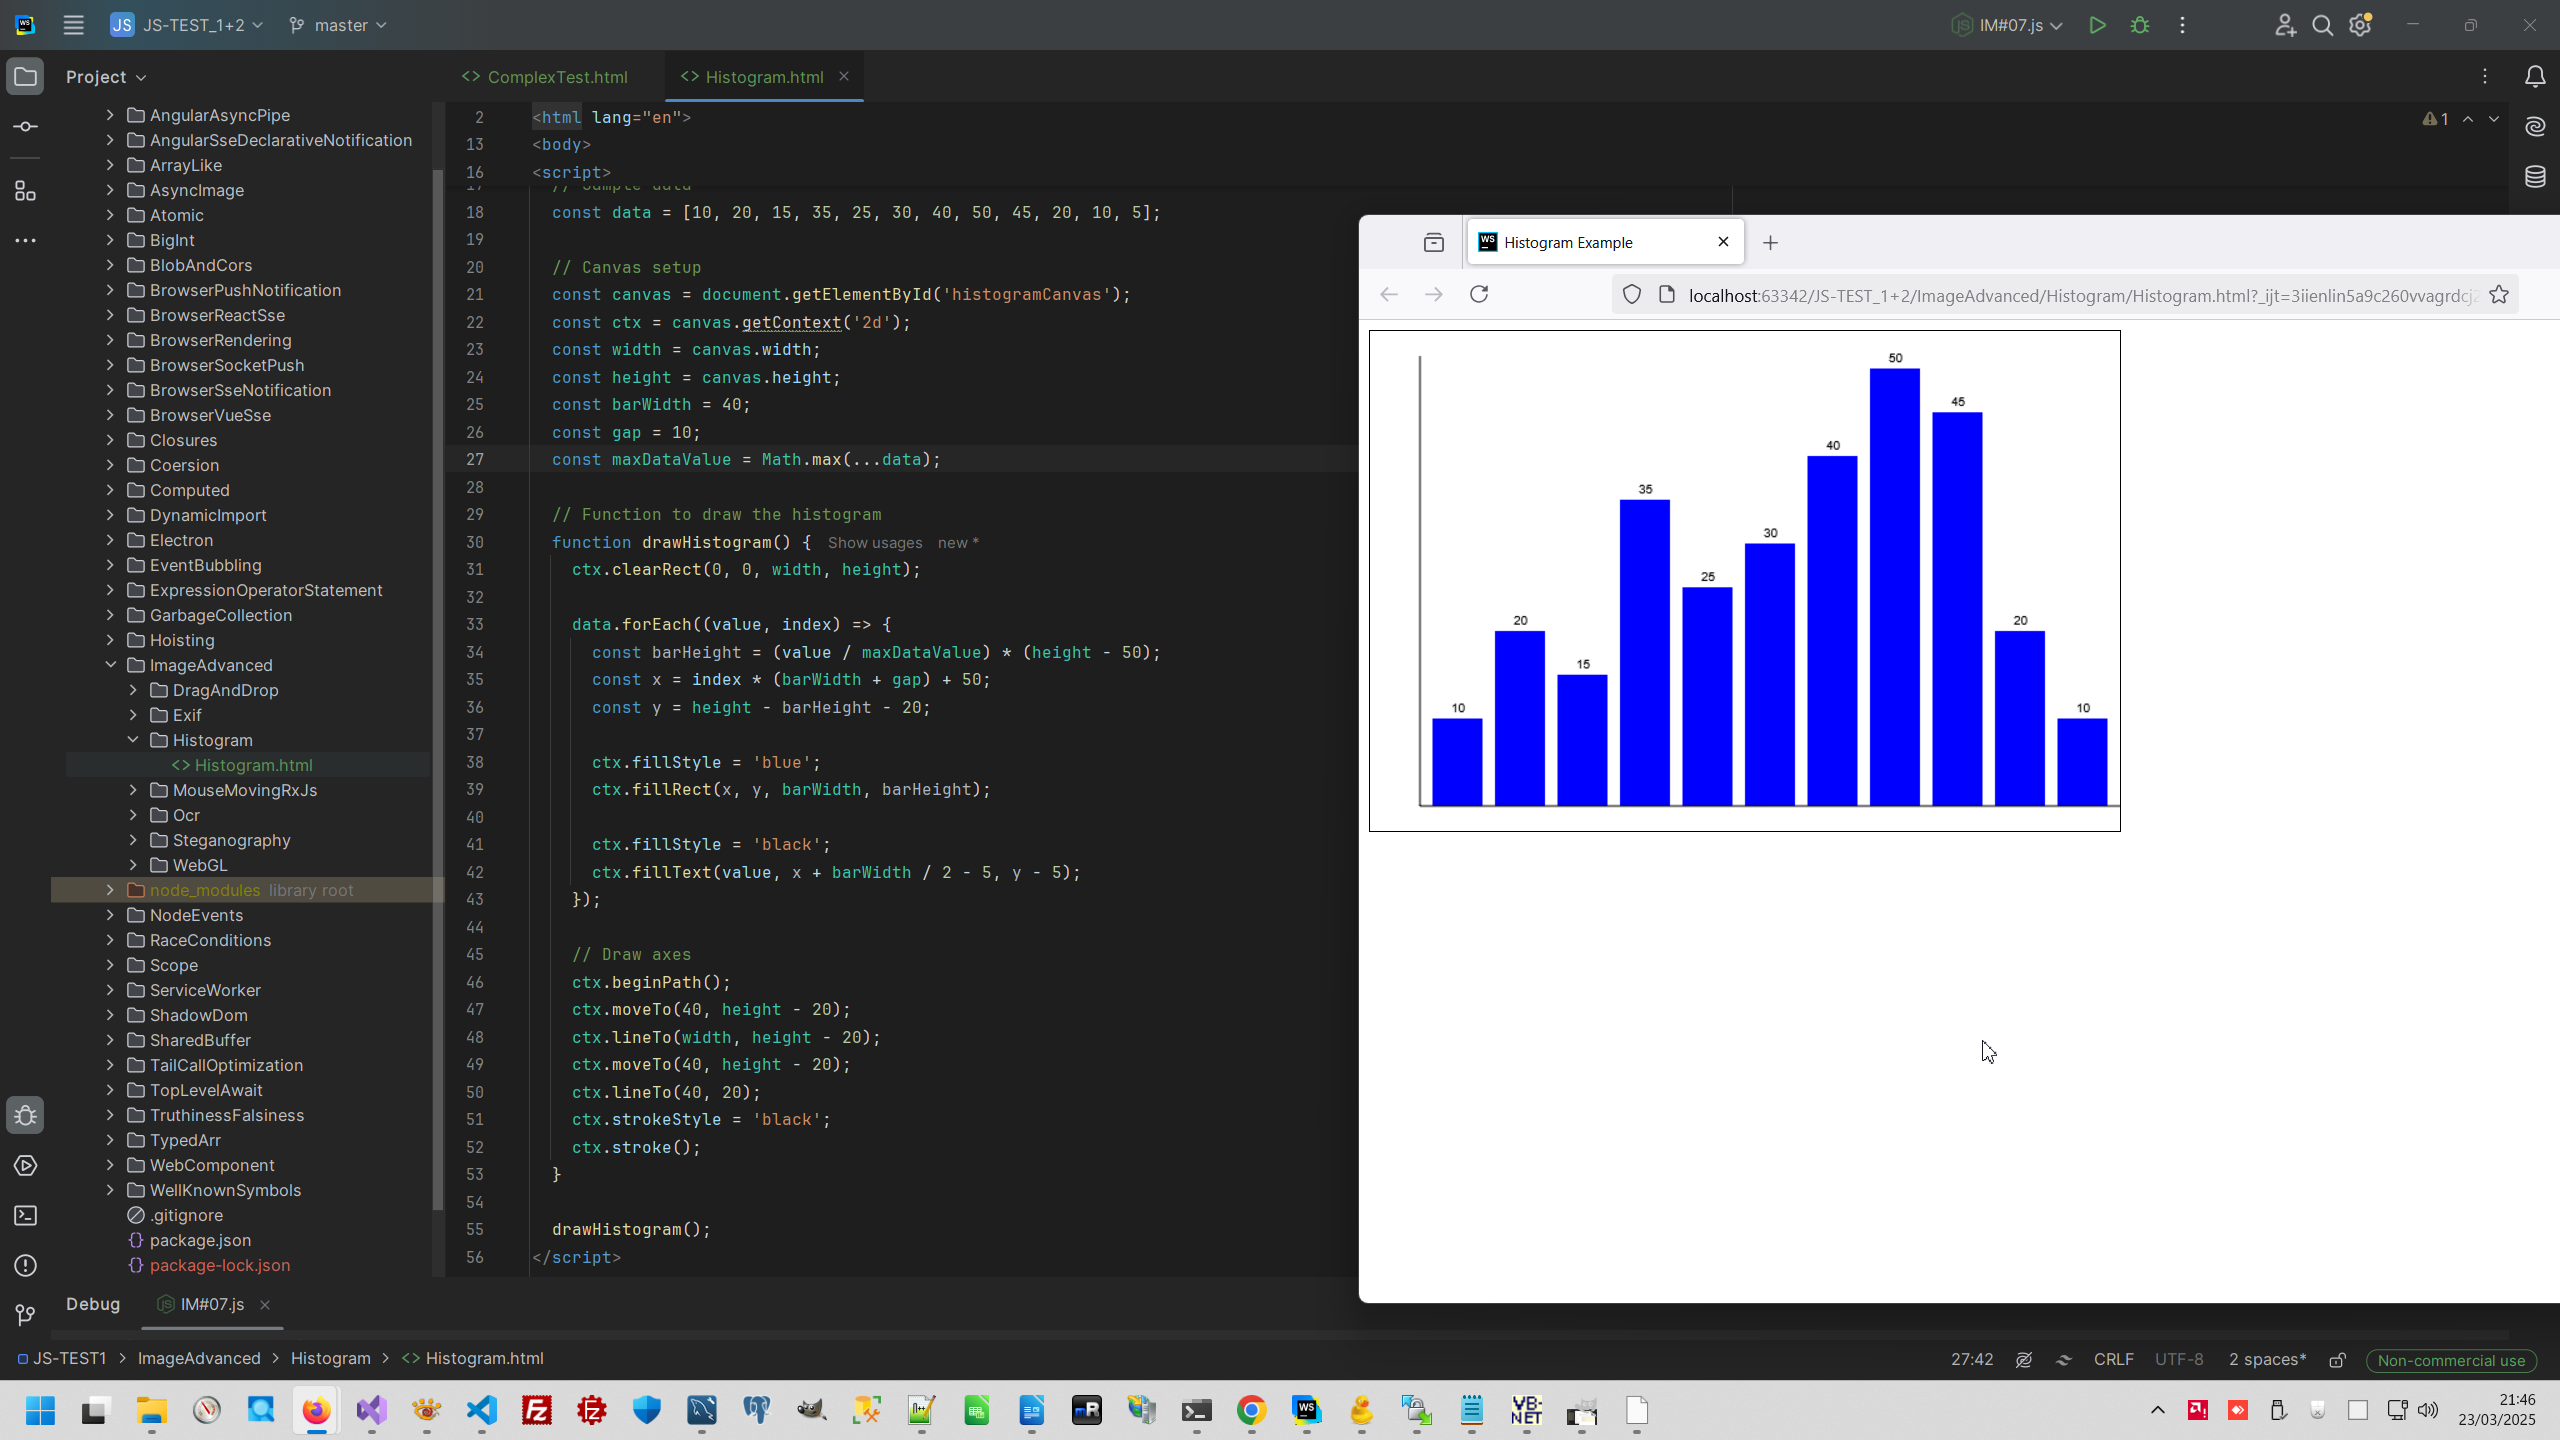
Code uploaded to https://github.com/AAlex-11/ImageAdvanced/tree/main/Histogram
10. Apply Watermark to images.
I make Watermark on .NET framework since 2002 year, this is example from 2006 year Applying copyright to drawings, but now I change my focus to Javascript and make the same function in Javascript instead Visual Basic.
1:
2: //<canvas id="watermarkCanvas" width="800" height="600"></canvas>
3:
4: const img = document.getElementById('sourceImage');
5: img.onload = function() {
6: const canvas = document.getElementById('watermarkCanvas');
7: const ctx = canvas.getContext('2d');
8:
9: // Set canvas dimensions to match the image
10: canvas.width = img.width;
11: canvas.height = img.height;
12:
13: // Draw the image on the canvas
14: ctx.drawImage(img, 10, 0);
15:
16: // Add watermark
17: ctx.font = '20px Arial';
18: ctx.fillStyle = 'rgba(255, 255, 255, 0.5)'; // Semi-transparent white
19: ctx.fillRect(10, 10, 150, 150); // Background for watermark
20:
21: ctx.fillStyle = 'rgba(0, 0, 0, 0.7)'; // Semi-transparent black
22: ctx.fillText('Watermark', 30, 100); // Watermark text
23: };
24:
25: // Load the image
26: img.src = 'http://localhost:3000/image/';
27:
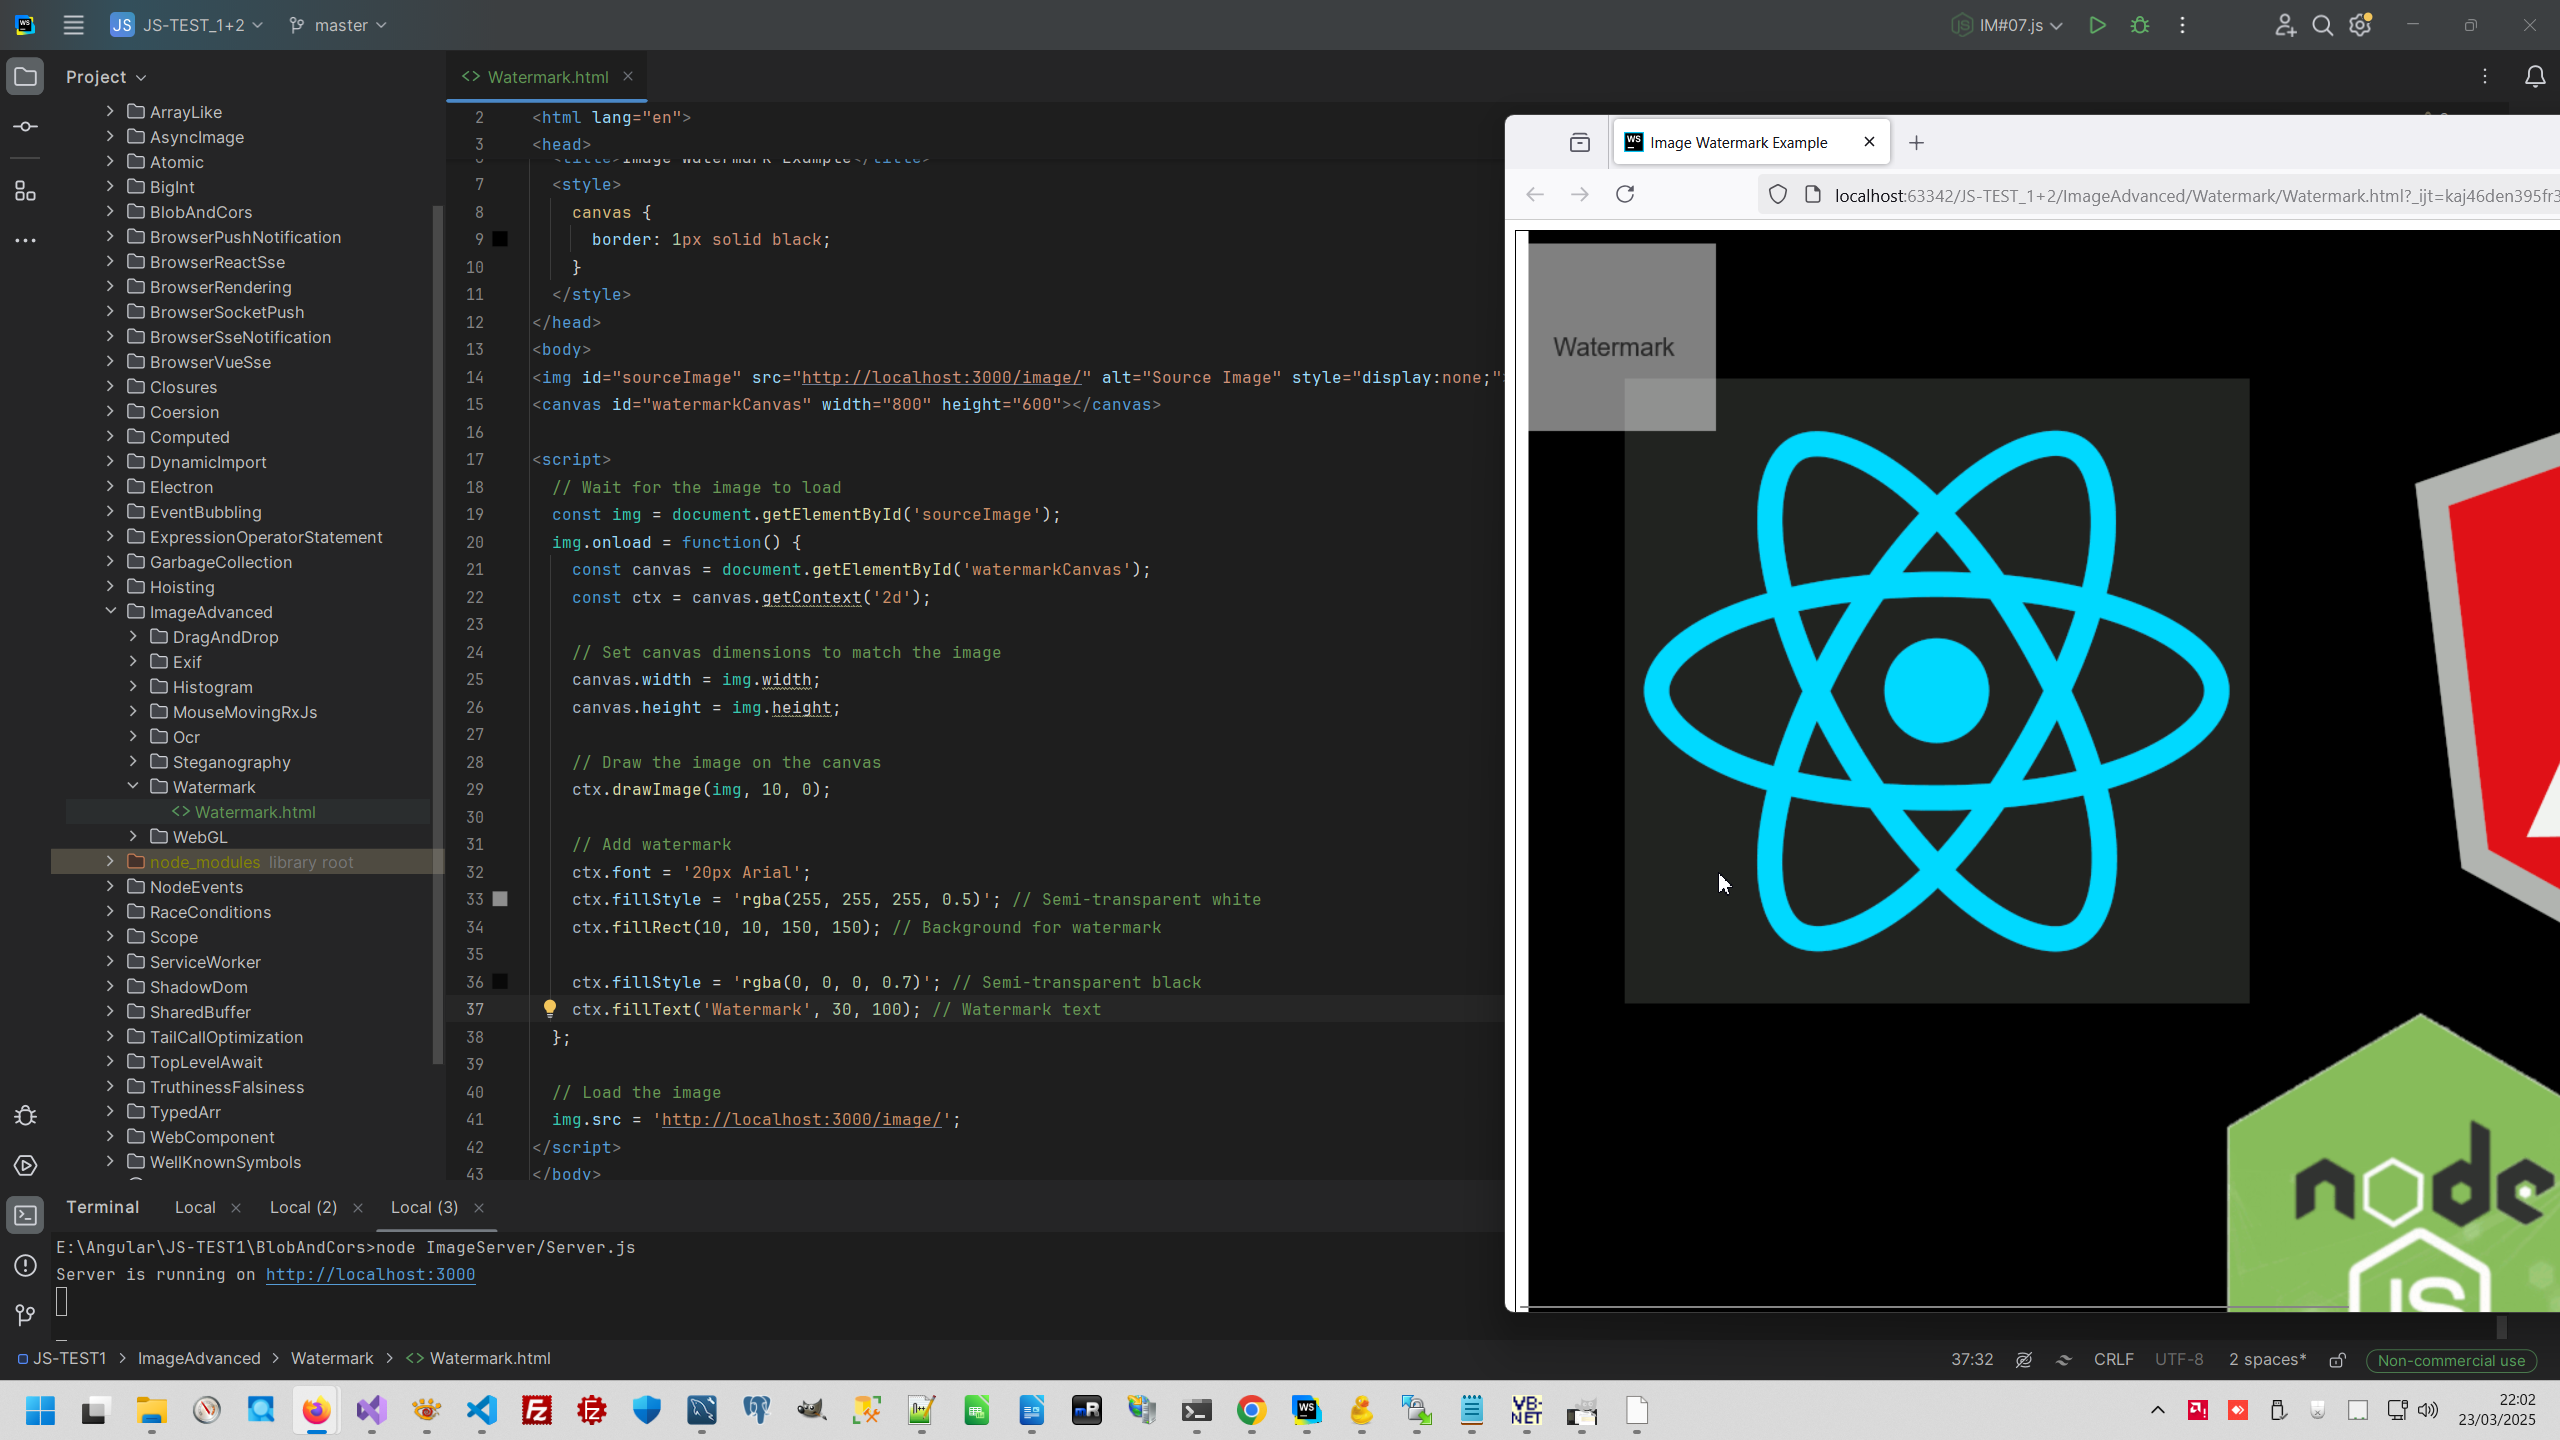
Code uploaded to https://github.com/AAlex-11/ImageAdvanced/tree/main/Watermark
11. Other Advanced Image manipulation.
- OpenCV.js - object detection, facial recognition, and feature matching
- TensorFlow.js - machine learning-based image processing, such as image classification, object detection, and style transfer
- Fabric.js - advanced canvas manipulation, including grouping, layering, and interactive object manipulation.
- CocoSsd.js - detect objects in images.
- Face-api.js, Tracking.js - detect and recognize faces in images.
- Tesseract.js - extract text from images.
- PixiJS.js - create particle effects based on image data.
Browser context:
FrontLearning context:
 )
)
|
|